> ## Documentation Index
> Fetch the complete documentation index at: https://docs.ticketspotapp.com/llms.txt
> Use this file to discover all available pages before exploring further.
# Connect Shopify
Connecting **Ticket Spot** to your **Shopify** store makes it easy to publish events as products and sell tickets directly through Shopify Checkout. Once connected, you can send any Ticket Spot event to Shopify, add the Ticket Selector to your product page, and allow guests to receive their tickets immediately after purchase.
This guide shows how to install the app and enable optional Shopify features so you can start selling tickets on Shopify quickly and easily.
Let’s get started 🚀
## Navigation
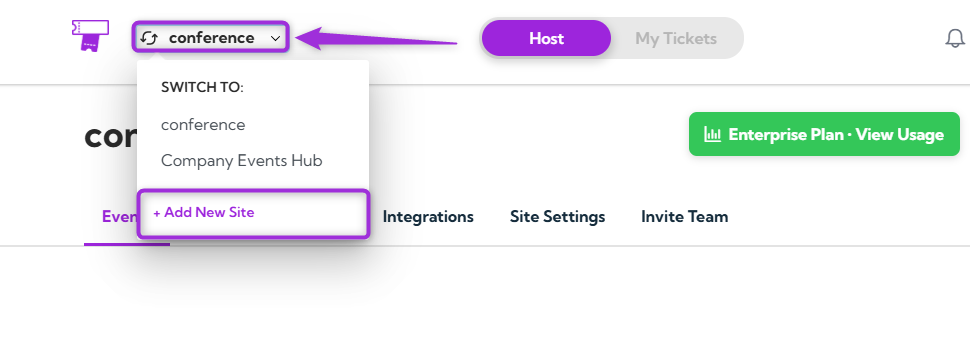
**Step 1:** Click on the site name in the top-left corner, open the dropdown menu, and select **+ Add New Site** to start adding a new site.
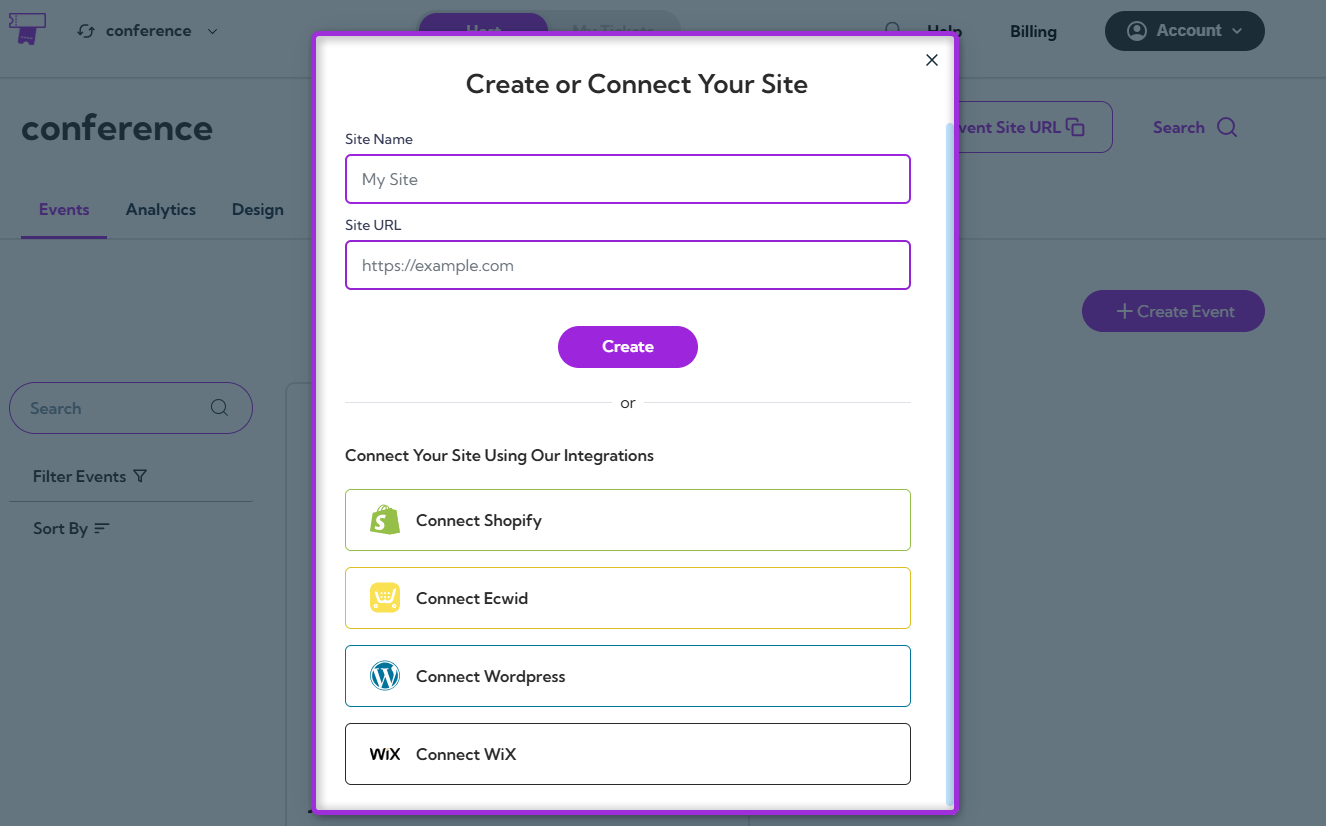
A modal window will appear where you can **Create or Connect Your Site**.
**Step 2:** Click **Connect Shopify** to start linking your store.
## Install the Ticket Spot App
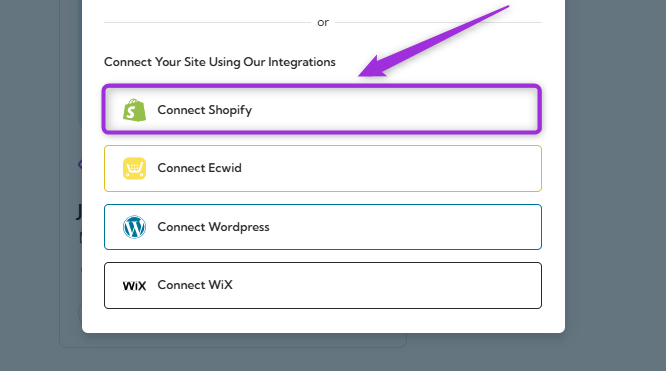
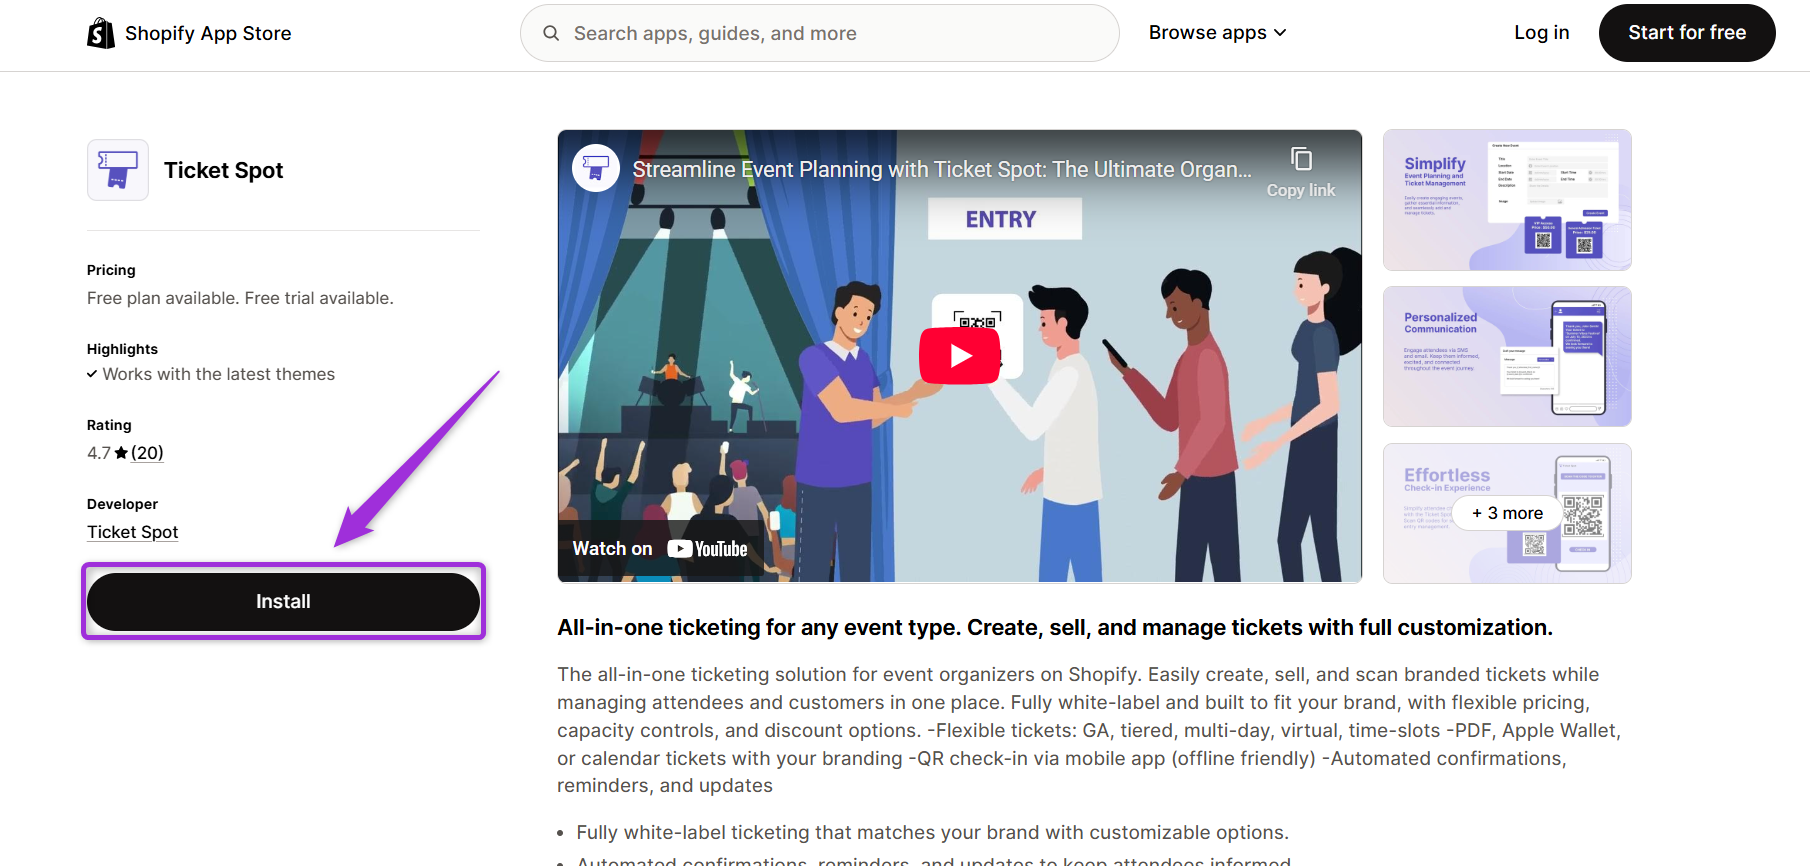
1. You’ll be redirected to the Ticket Spot page in the **Shopify** App Store. Click **Install** to proceed.
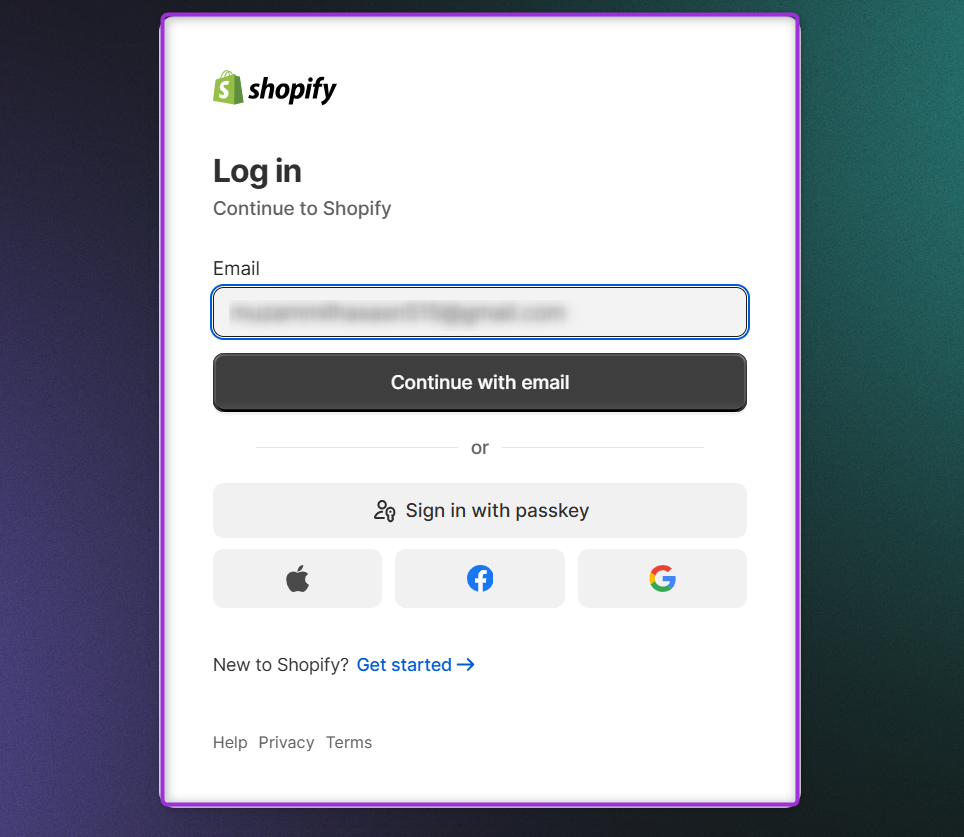
2. Shopify authorization screen will appear, where you can authenticate yourself using your store credentials to complete the connection.
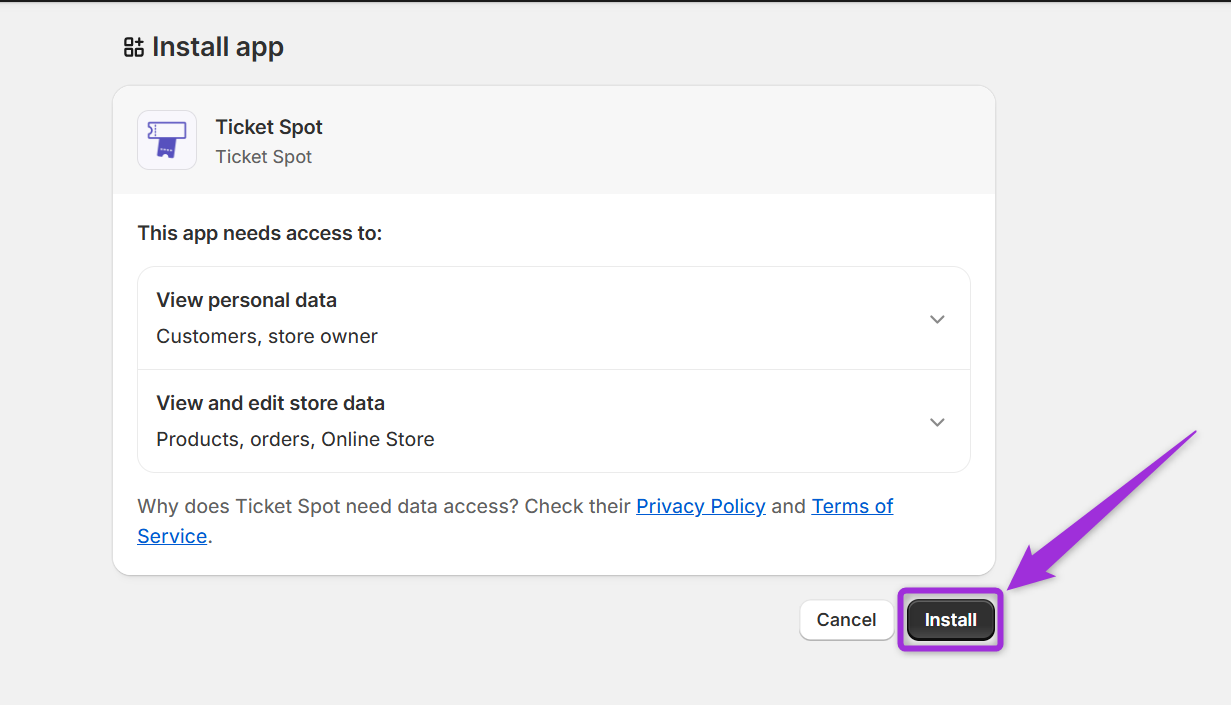
Click **Install** to authorize Ticket Spot and grant access to view personal data and manage store data.
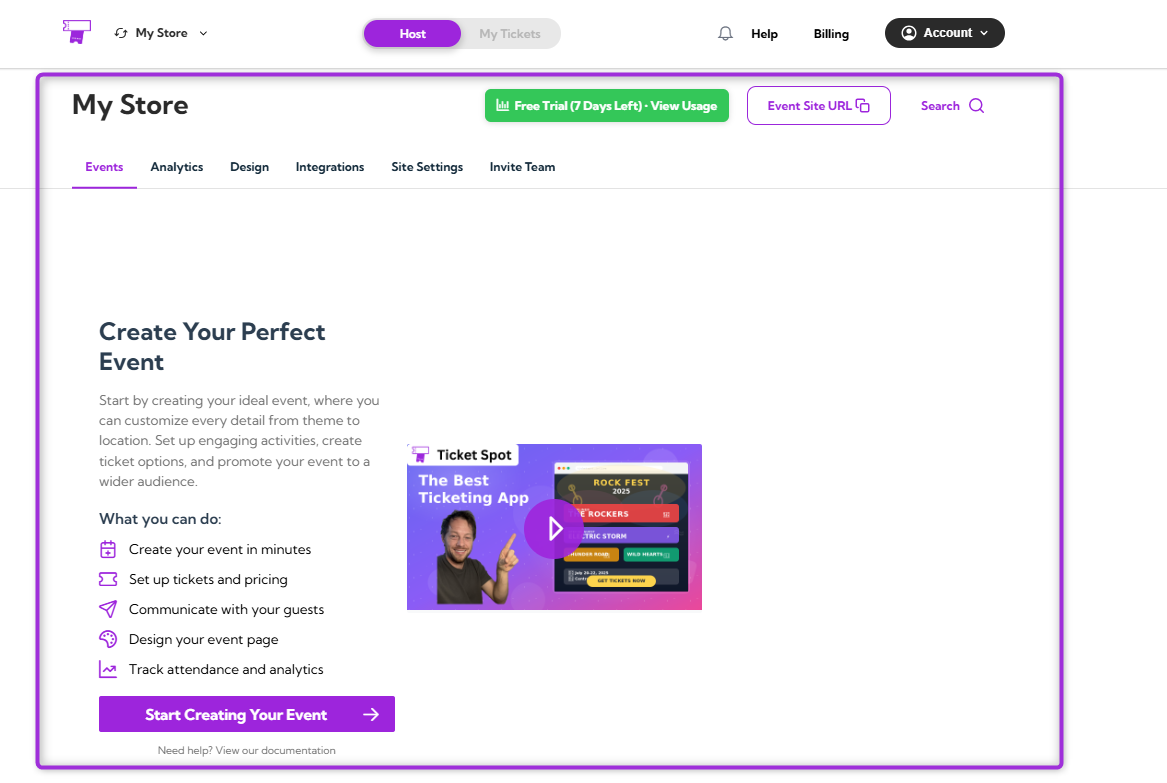
Your **Shopify** store is now **connected**, and you will be redirected back to the **Ticket Spot** web app, where you can create your first event.
## Create Your Event
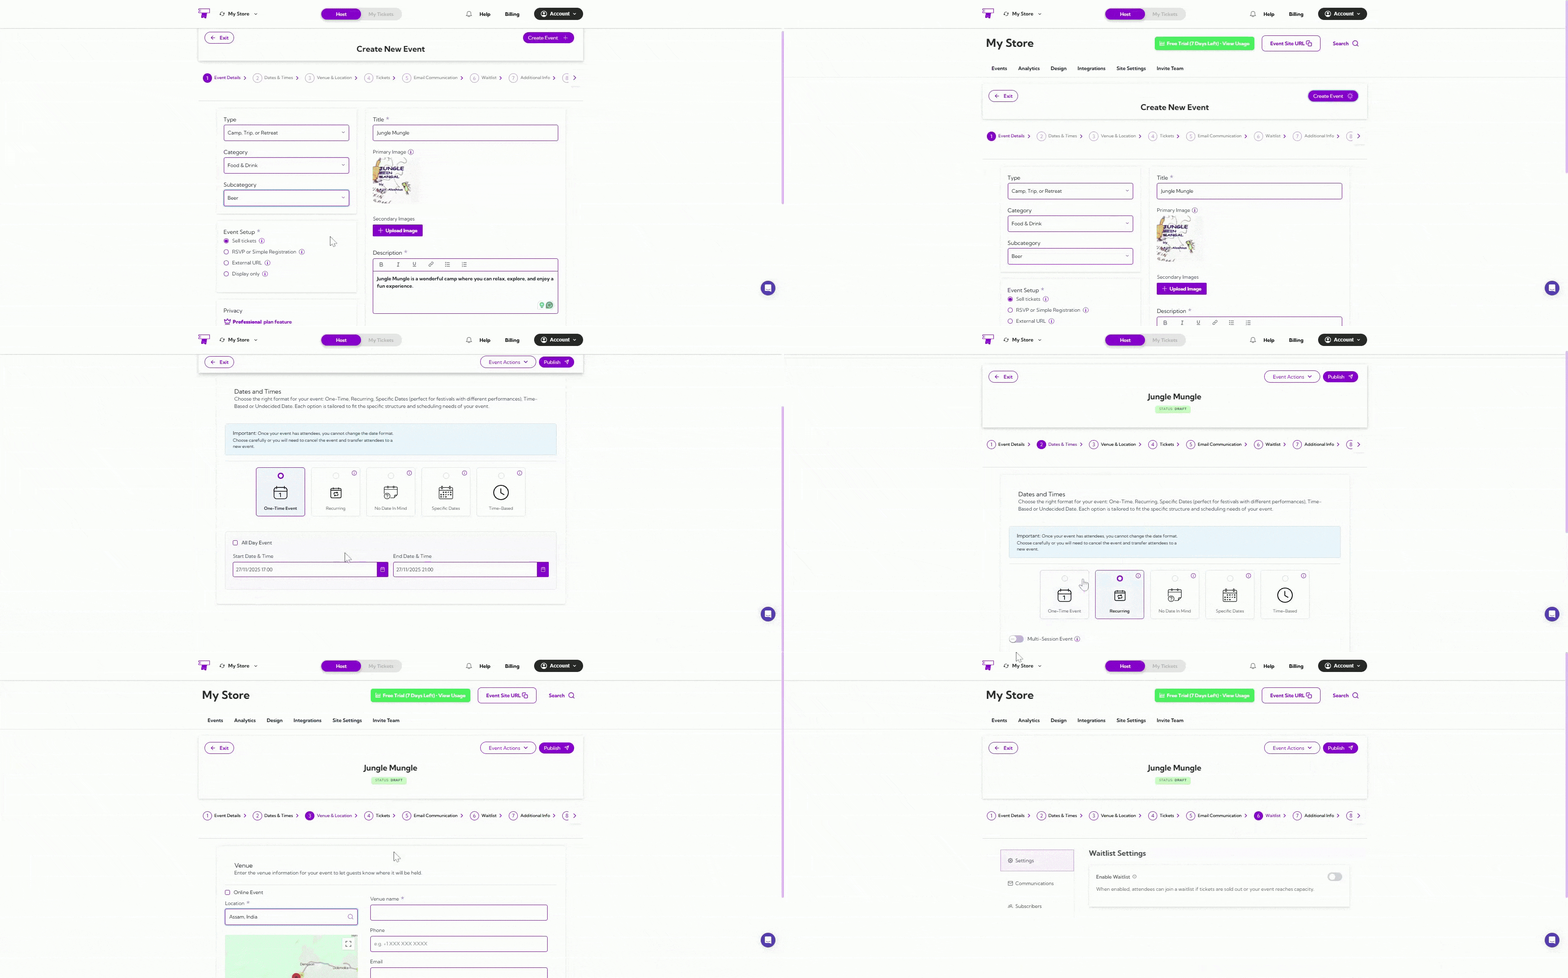
To create your event, enter the basic details, such as the event name, date, time, and venue. These fields help set up your event in Ticket Spot and prepare it for publishing.
For a full step-by-step walkthrough, please refer to our guide: **[How to Create an Event with Ticket Spot](../essentials/create-event-overview)**.
## Publish Your Event to Shopify
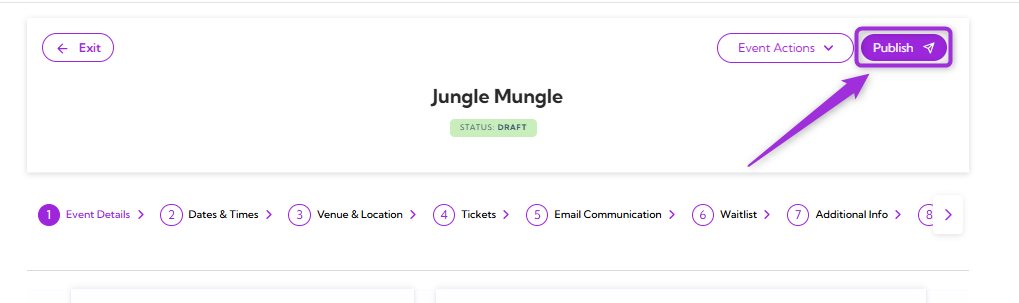
1. Click on the **Publish** button at the top of your event page.
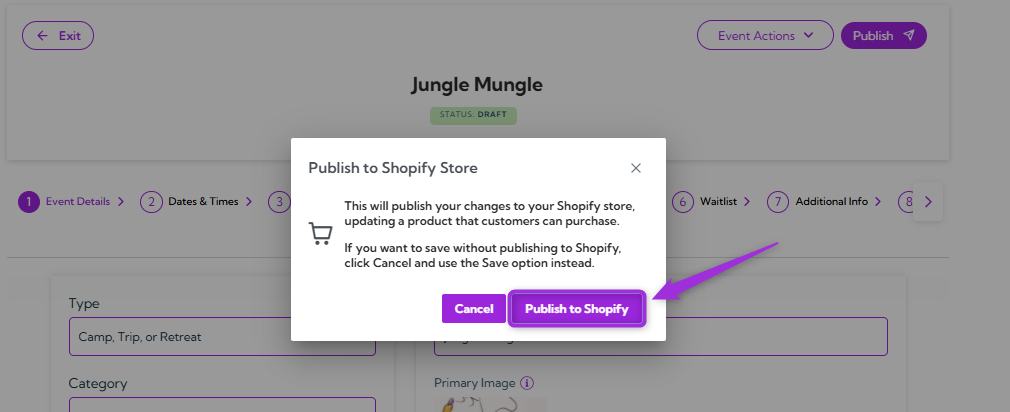
2. Click on the **Publish to Shopify** to publish your event and updates to your Shopify store. This creates or updates the Shopify product that customers can purchase.
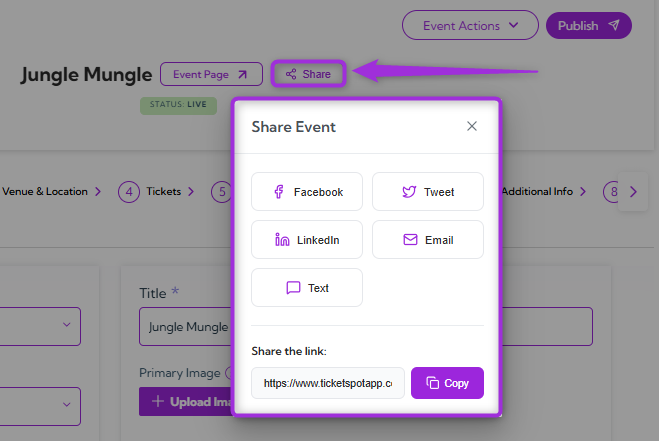
3. Click on the **Share** button to post your event on social media or copy the event link, allowing shoppers to view your event and purchase tickets directly.
## Check Out the Event
1. Click on the **Event Page** or open the event link to open your event page, where your event is listed.
2. Click on **Buy Tickets** to purchase a ticket for the event and complete the checkout.
## View Attendees in Your Dashboard
Once the purchase is completed, Shopify automatically sends attendee and order details to Ticket Spot.
Open your event in Ticket Spot and click on the **Manage Attendees** to view attendees of your event.
From here, you can see the full attendee list, update their status, view their details, send tickets, and manage all attendee actions in one place.
## Enable the Ticket Spot Selector (App Embed)
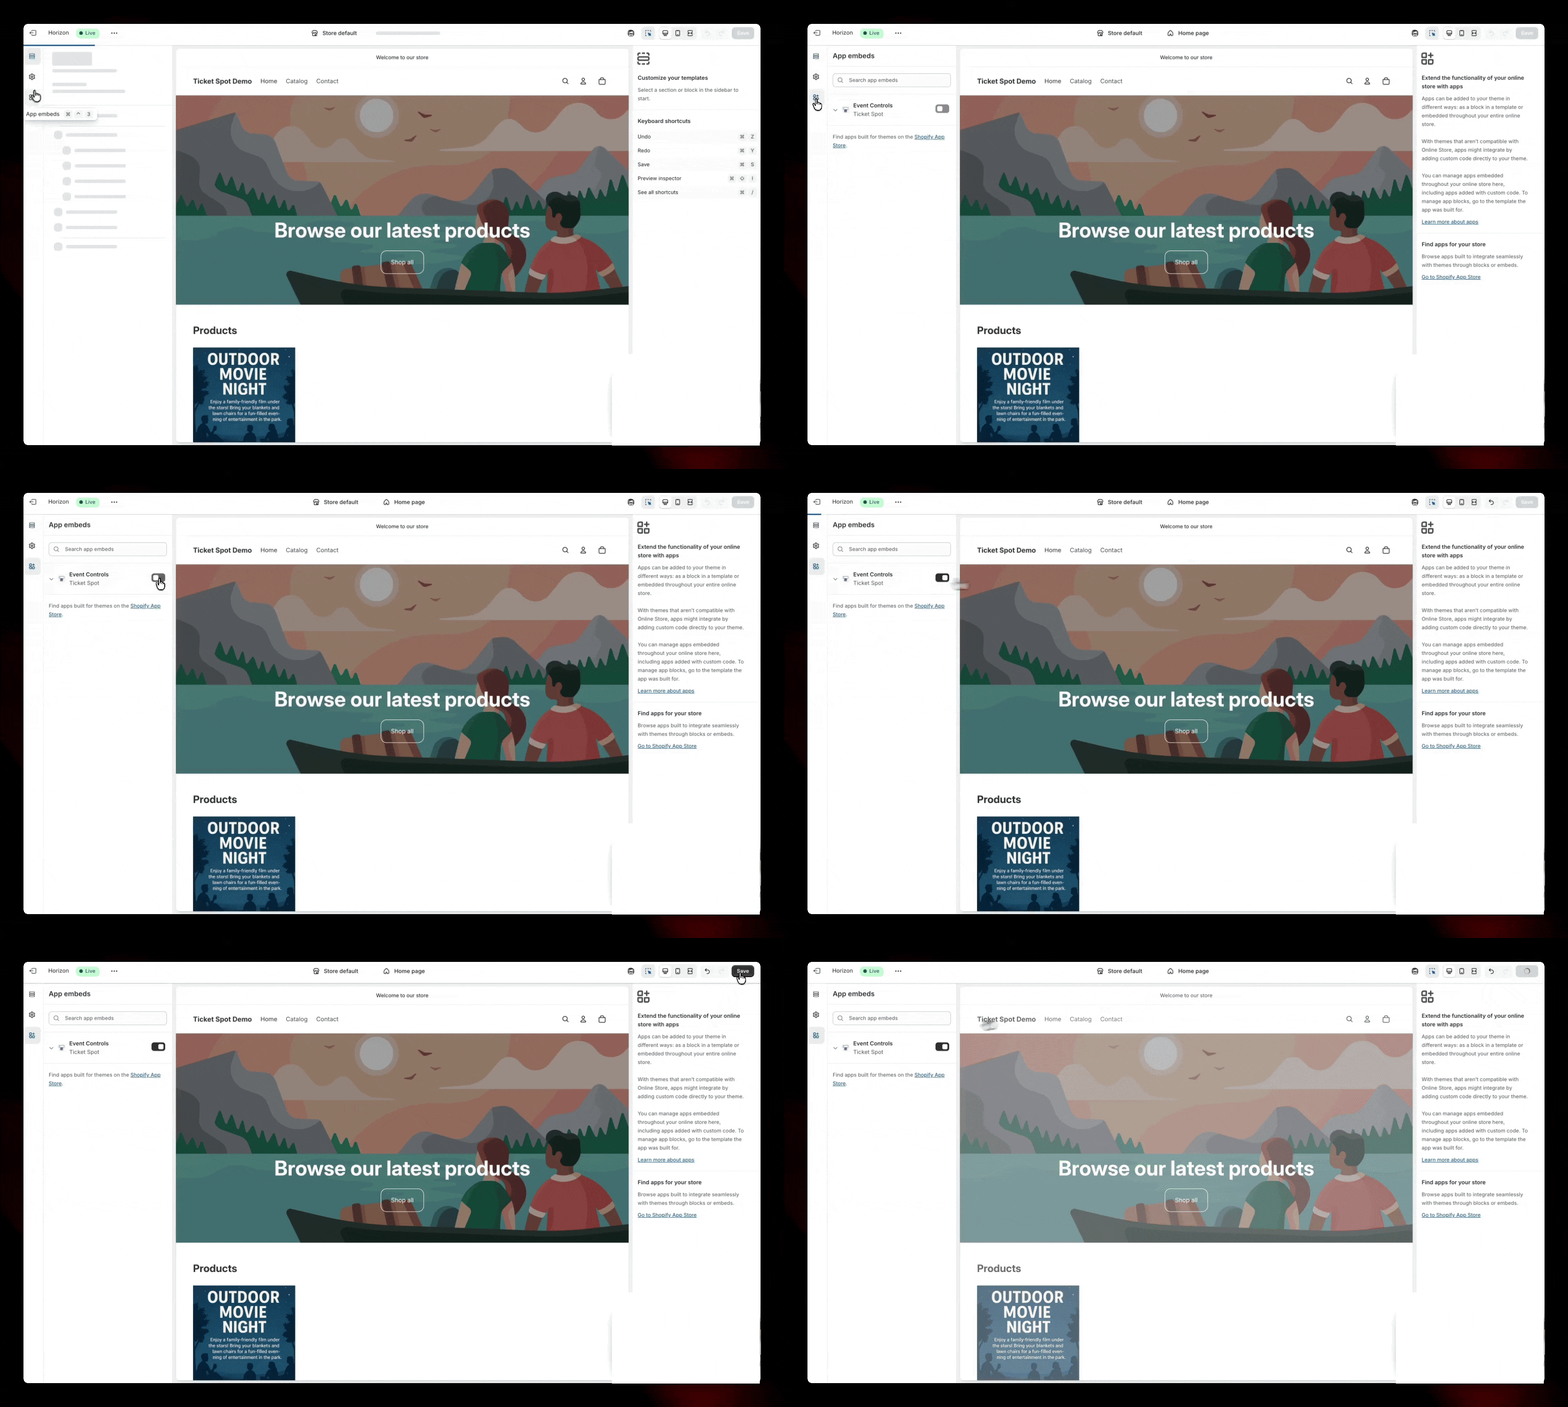
The App Embed allows you to replace Shopify’s basic variant dropdown with a clean **Buy Tickets** button. When enabled, it opens the Ticket Spot Selector—allowing guests to pick dates, timeslots, and ticket types directly on your product page.
1. In Shopify, open **Online Store** from the left-side menu and click on the **Customize** button.
2. Go to **App Embeds**, enable **Ticket Spot Controls**, and click **Save** to activate.
## Configure Advanced Ticket Controls
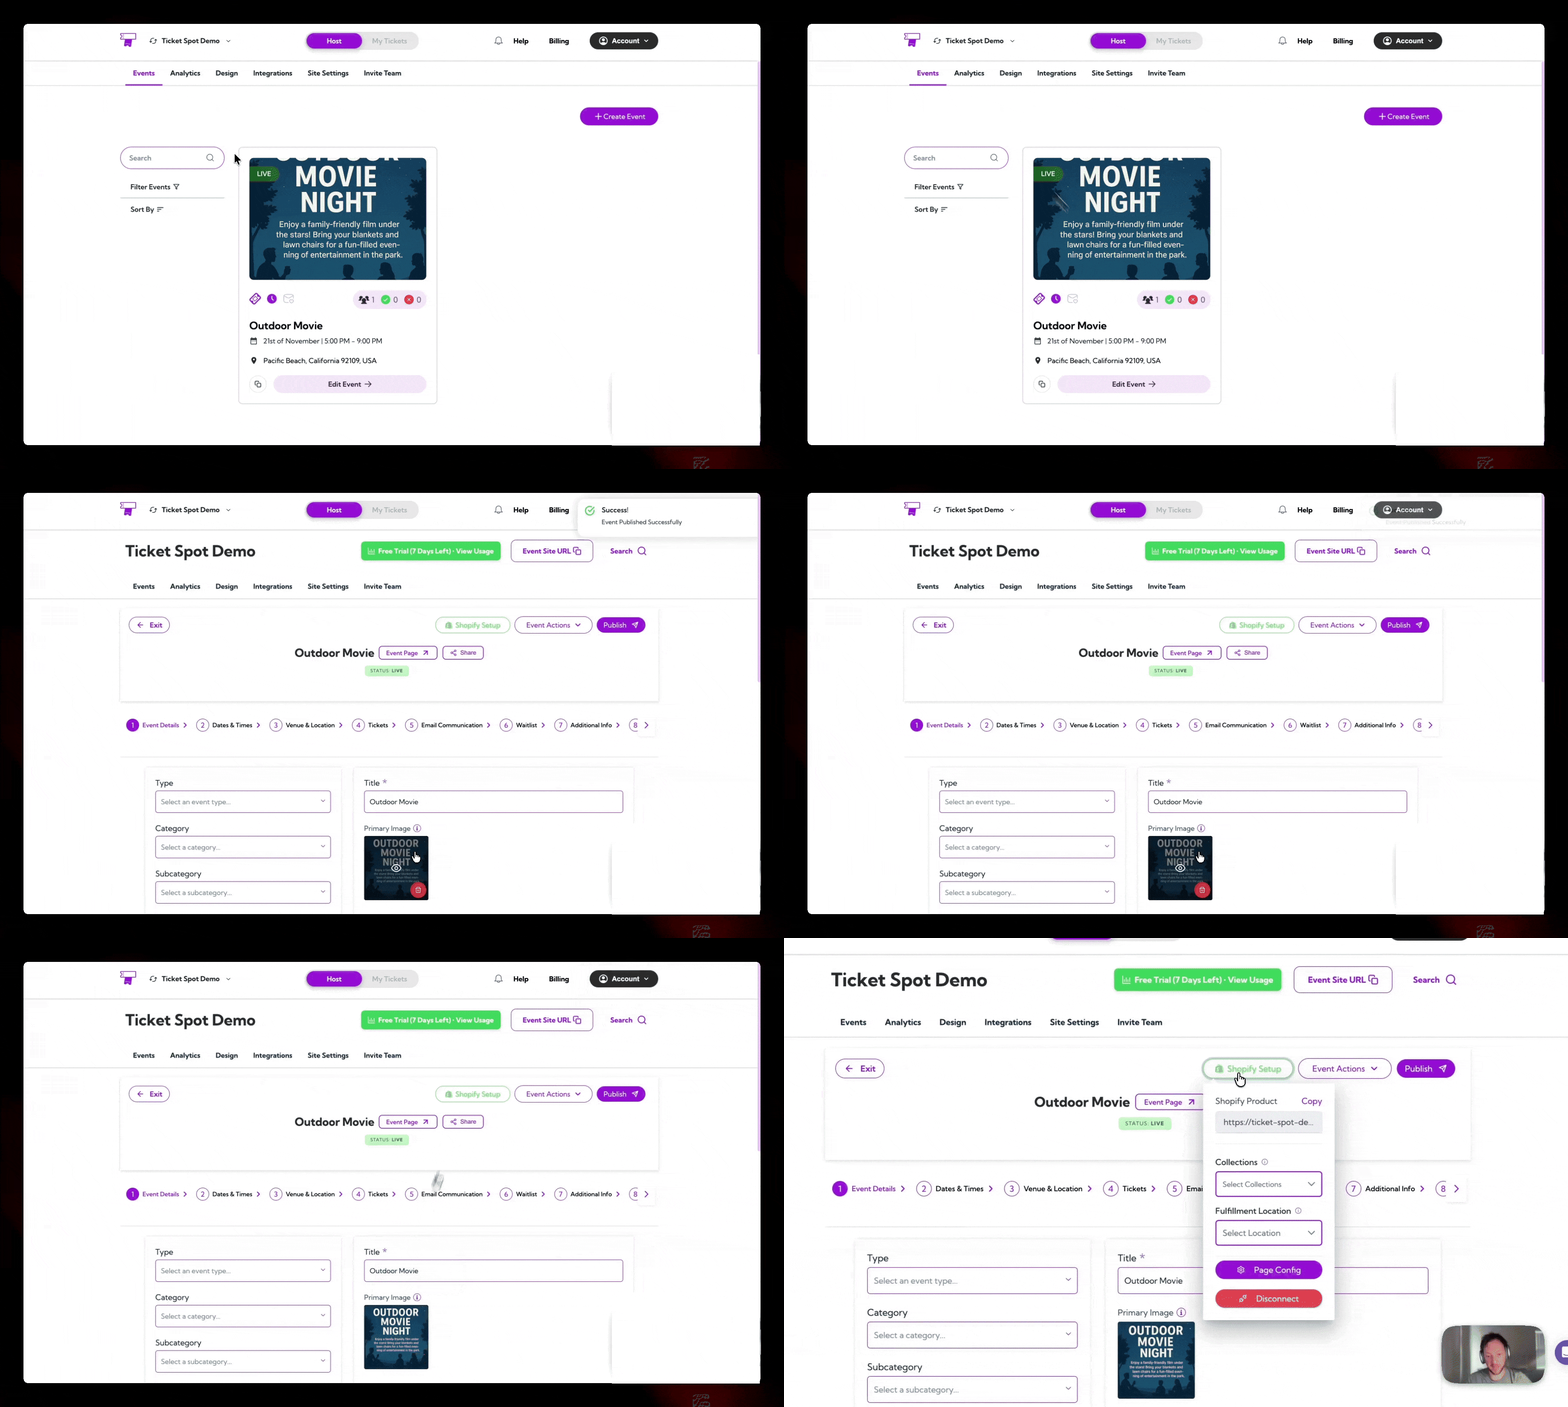
Go back to your Ticket Spot event and click on the **Shopify Setup** button.
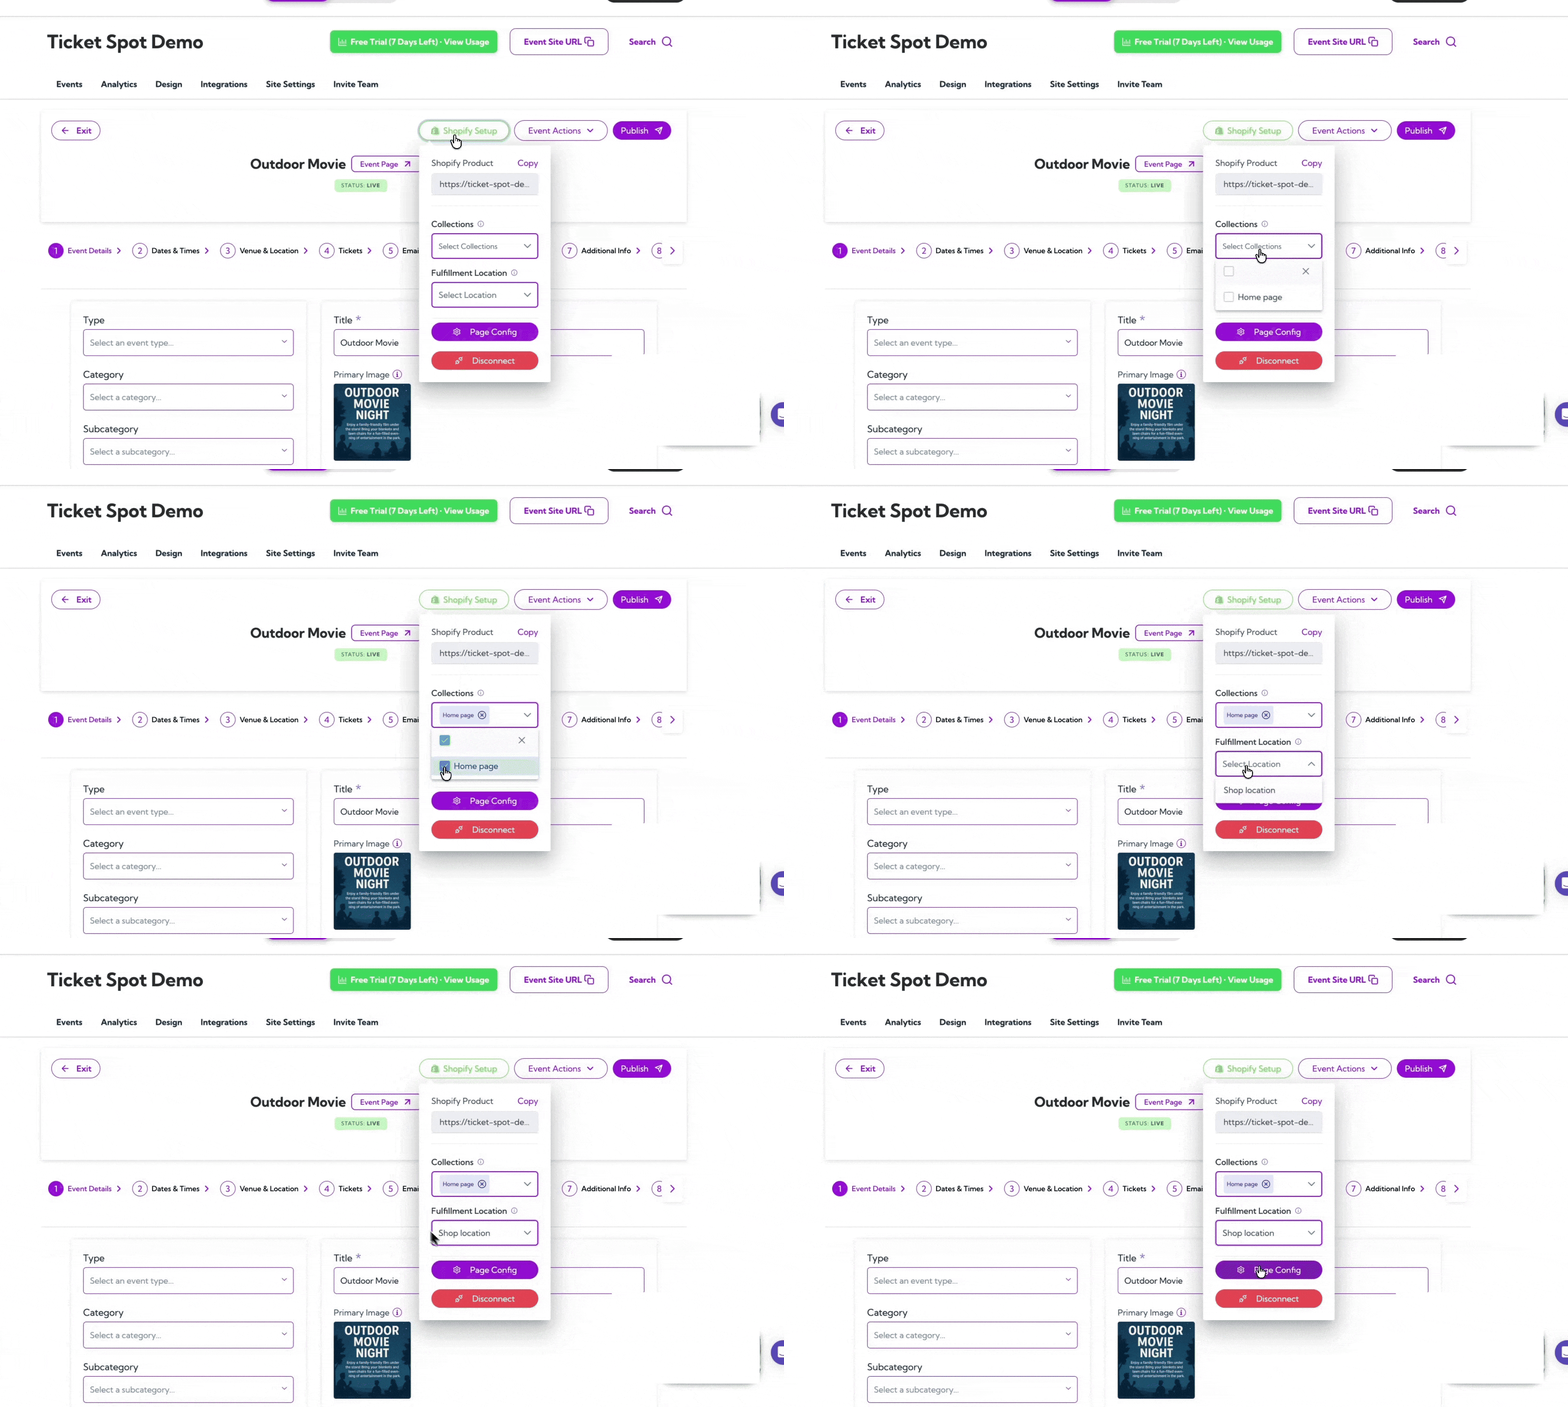
In Shopify Setup, you can:
* **Select a Collection** — Organize your event by adding it to a specific collection so customers can easily find it.
* **Select a Location** — Assign where the event will take place, helping you manage event details more accurately.
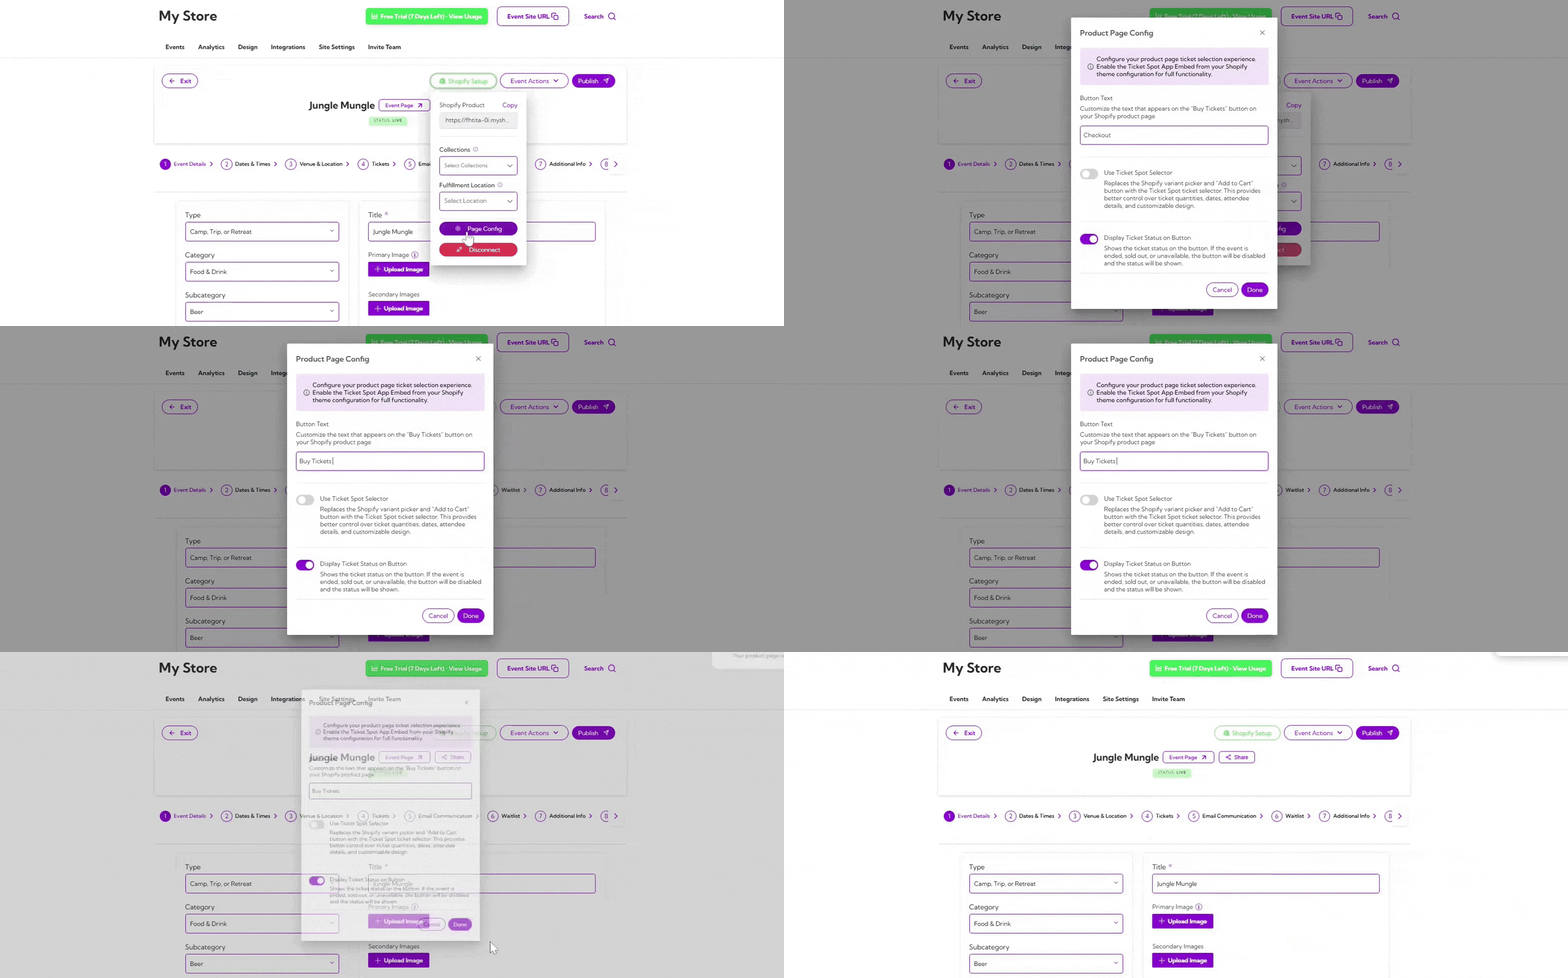
### Product Page Config:
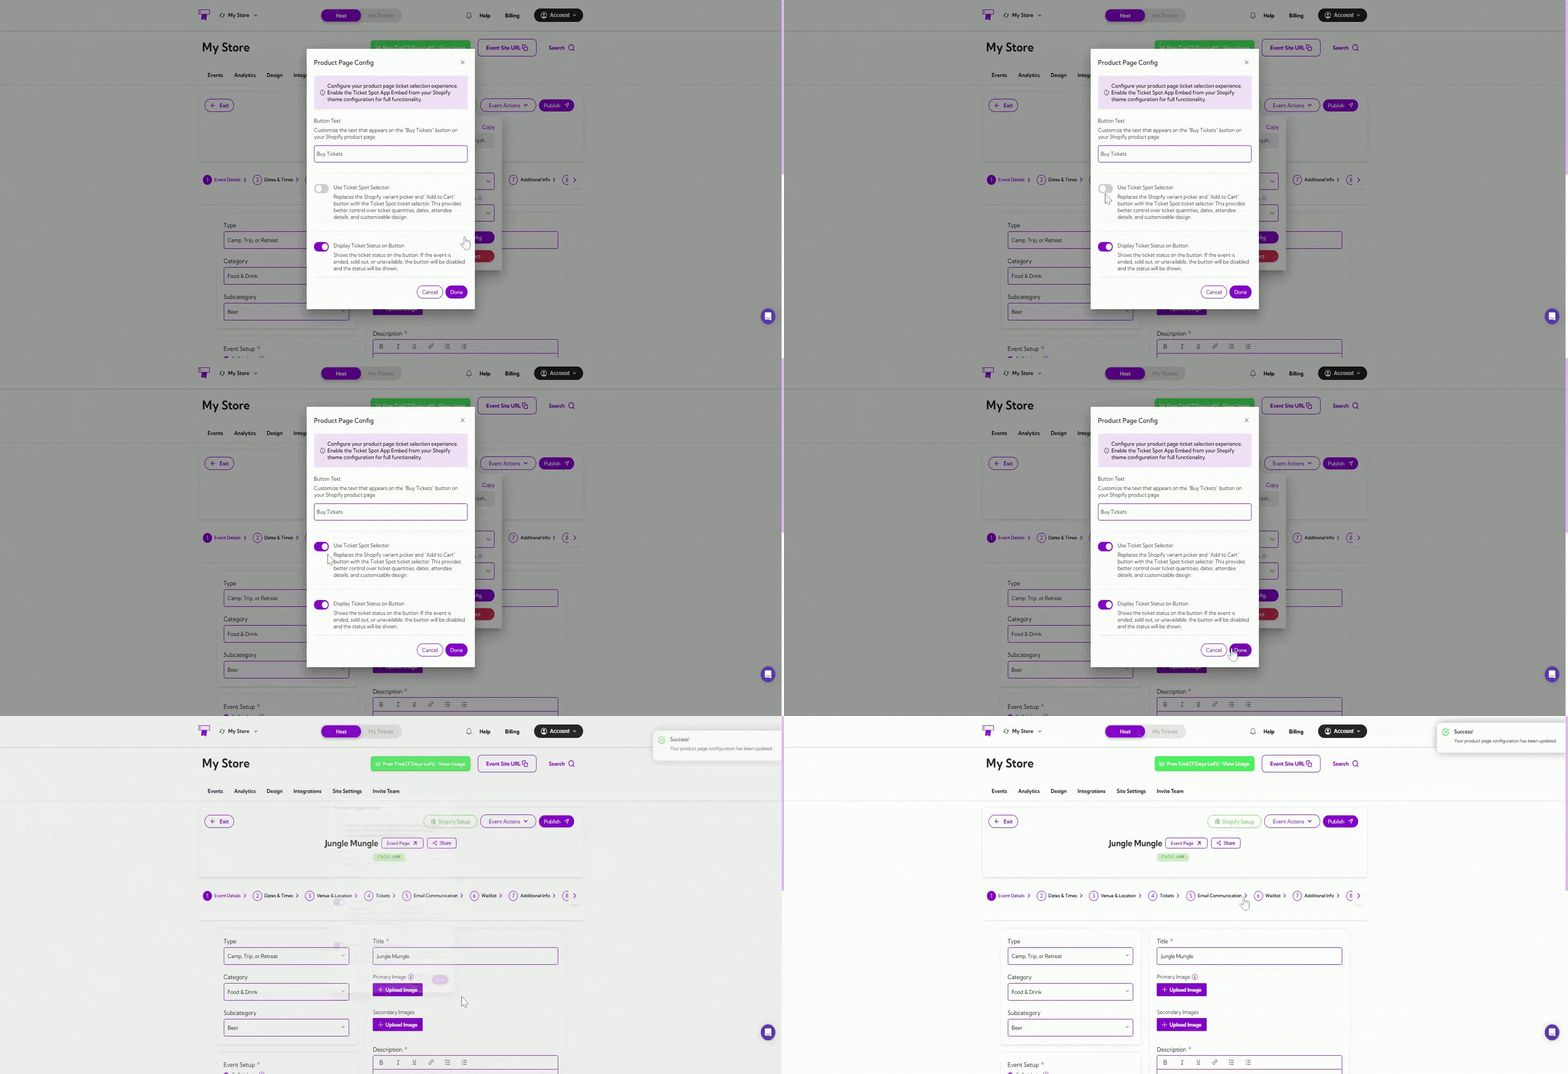
* **Customize the “Buy Tickets” Button:** You can customize the Buy Tickets button text—for example, change it to **Checkout** or any label you prefer.
* **Enable Ticket Spot Selector:** Activates a cleaner ticket-selection experience by replacing Shopify’s default checkout flow with Ticket Spot’s built-in ticket interface.
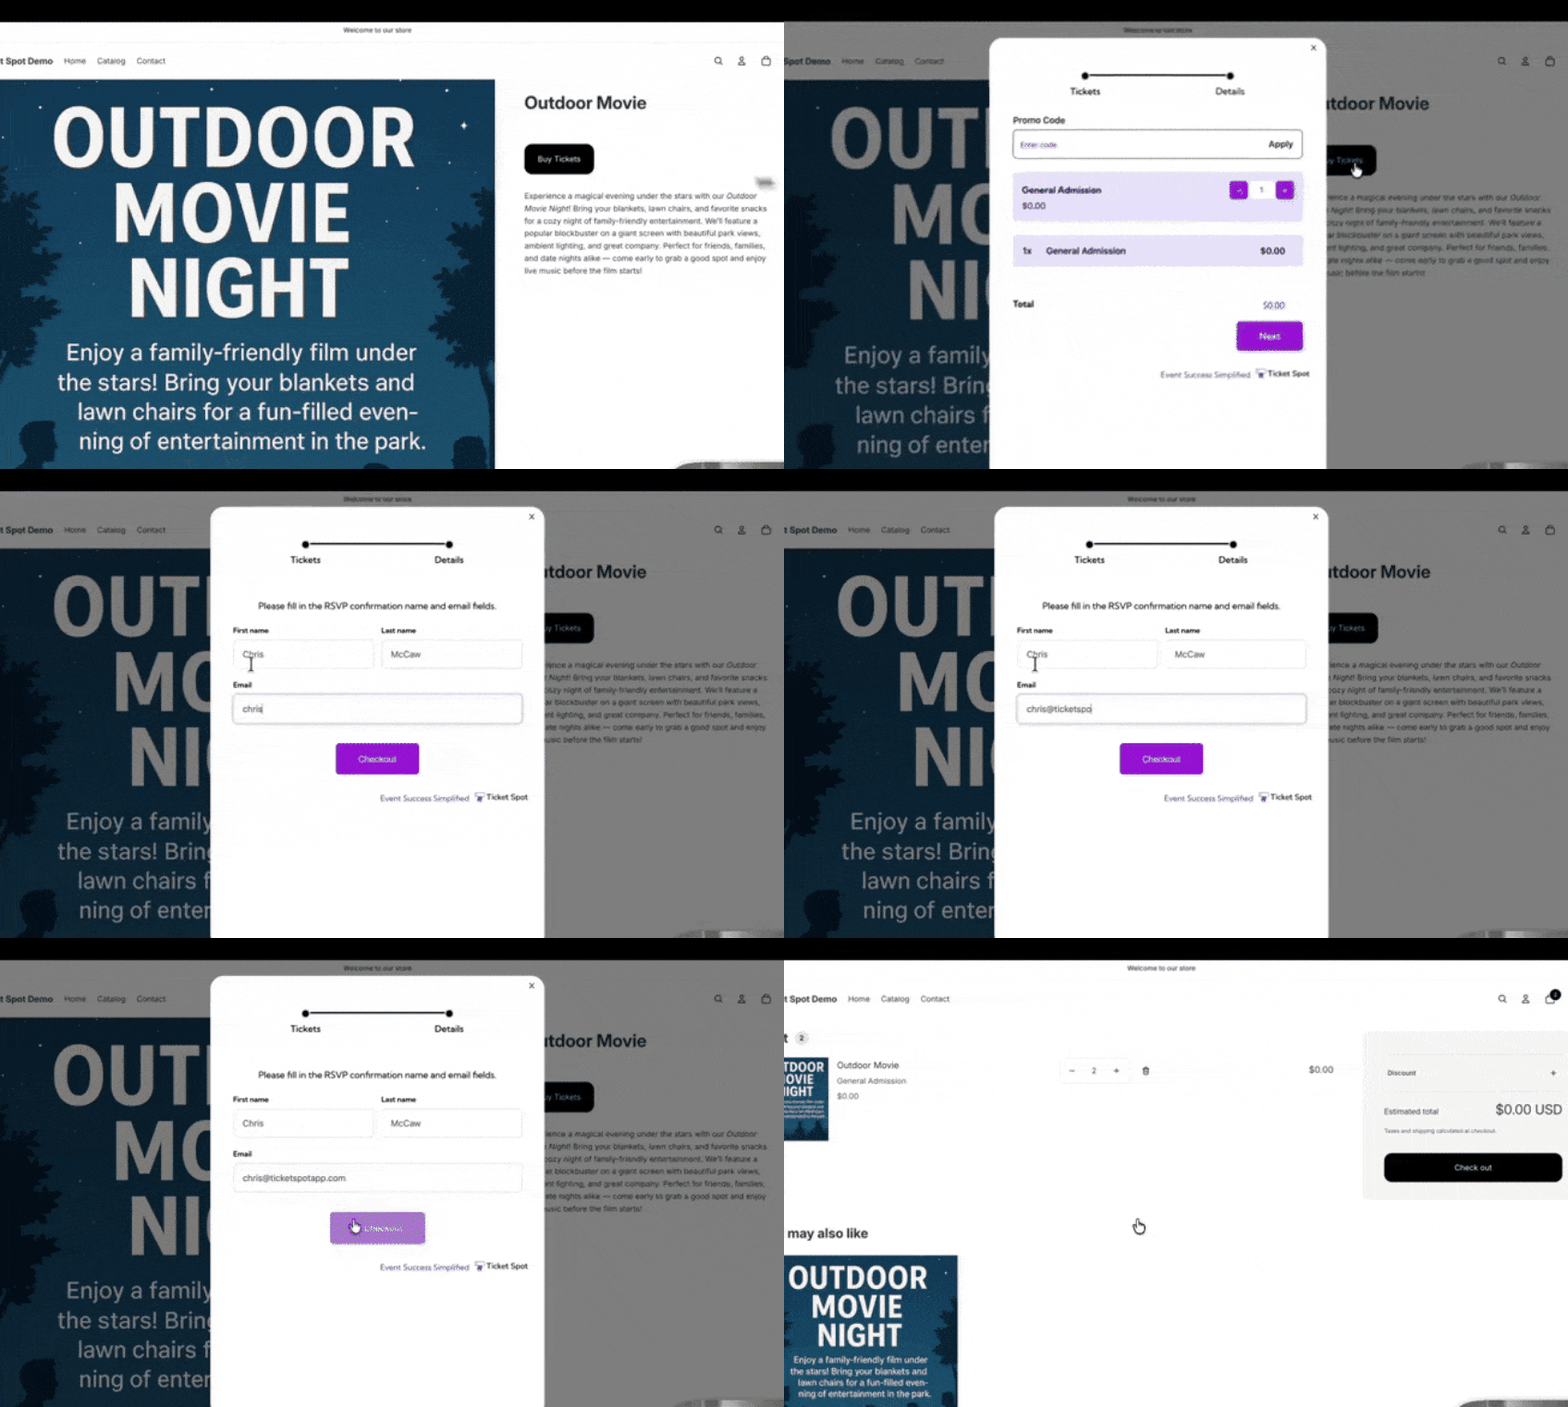
After enabling the **Ticket Spot Selector**, your product page updates with a **Buy Tickets** button instead of variants. Clicking it opens the Ticket Spot Selector, where customers pick tickets, enter details, and proceed to checkout.
## Enable the Ticket Block on the Thank You Page
Ticket Spot gives customers instant access to their tickets—QR code, PDF, and Apple Wallet—directly on Shopify’s Thank You page, making the post-checkout experience faster and more convenient.
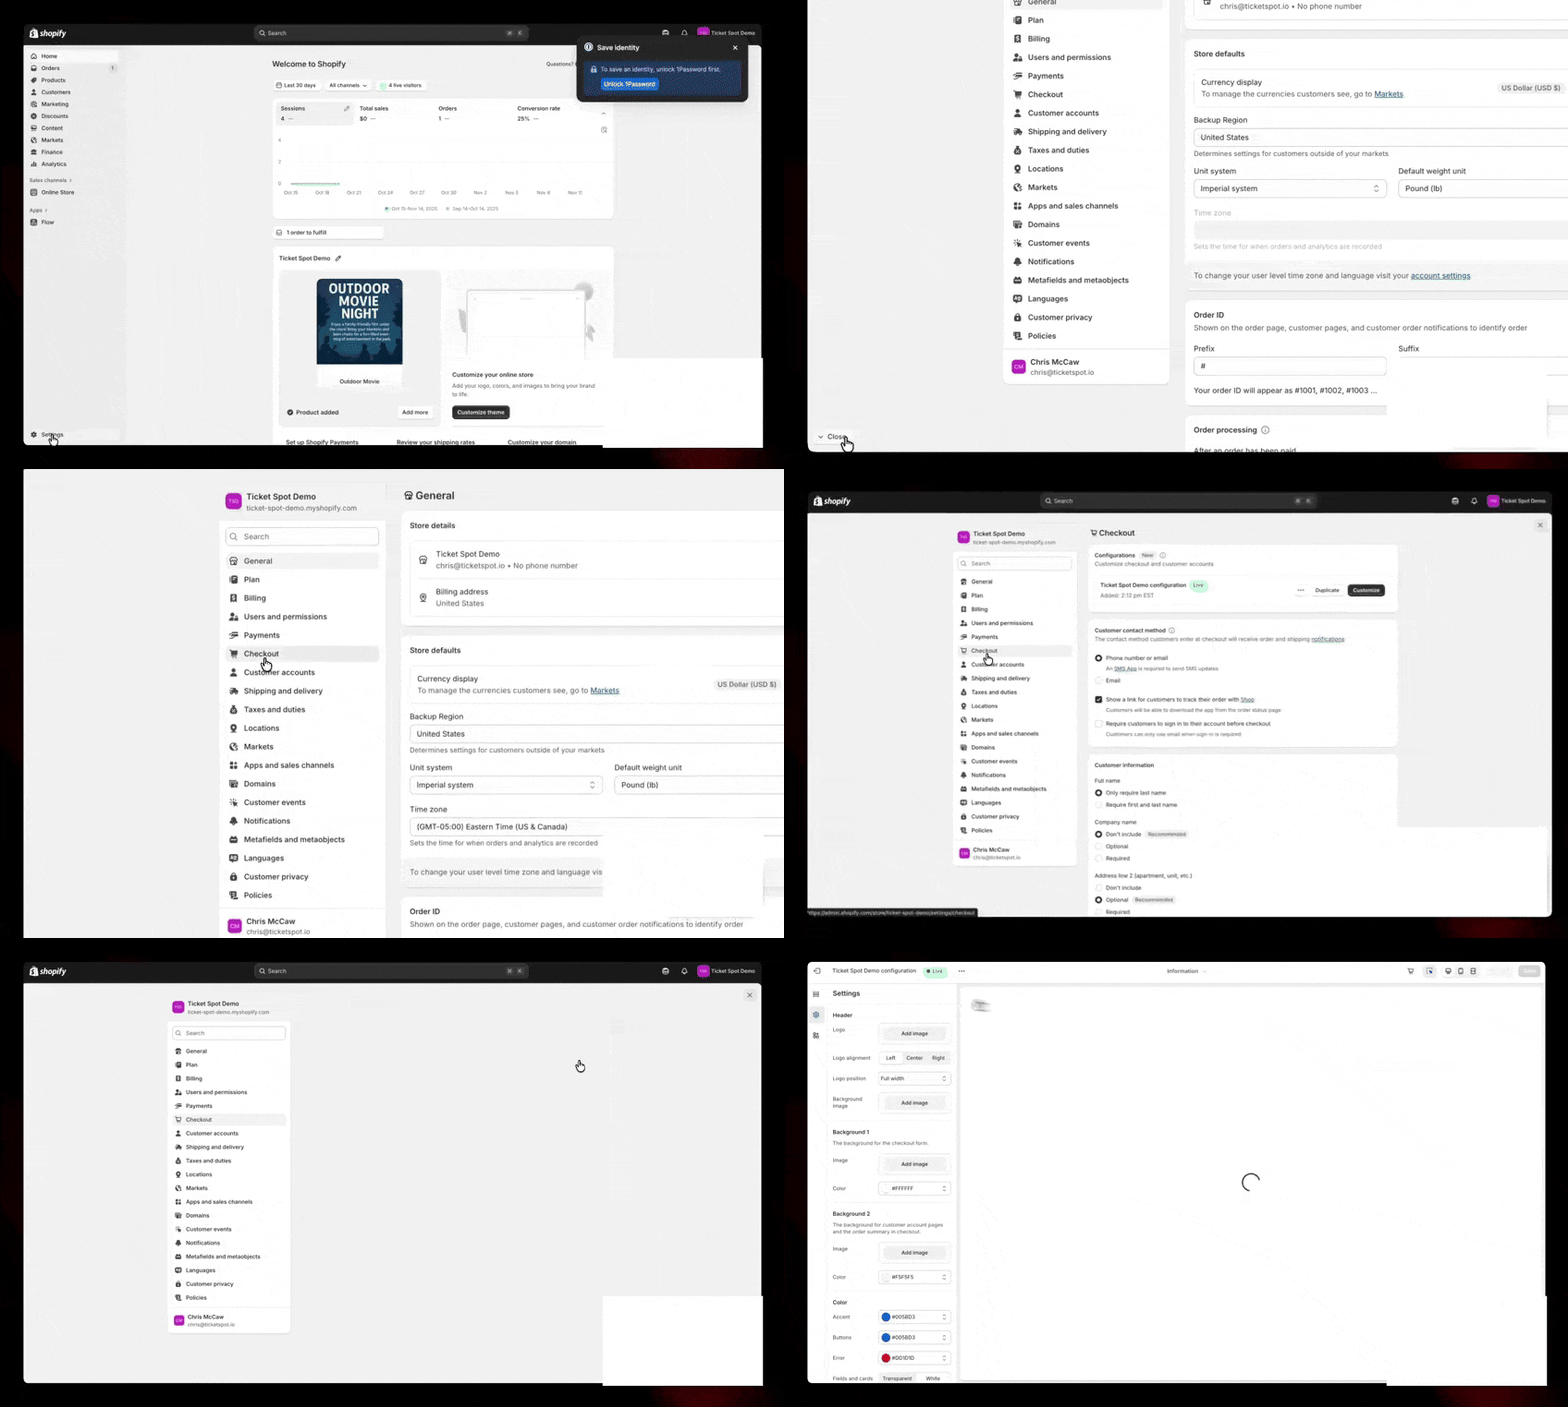
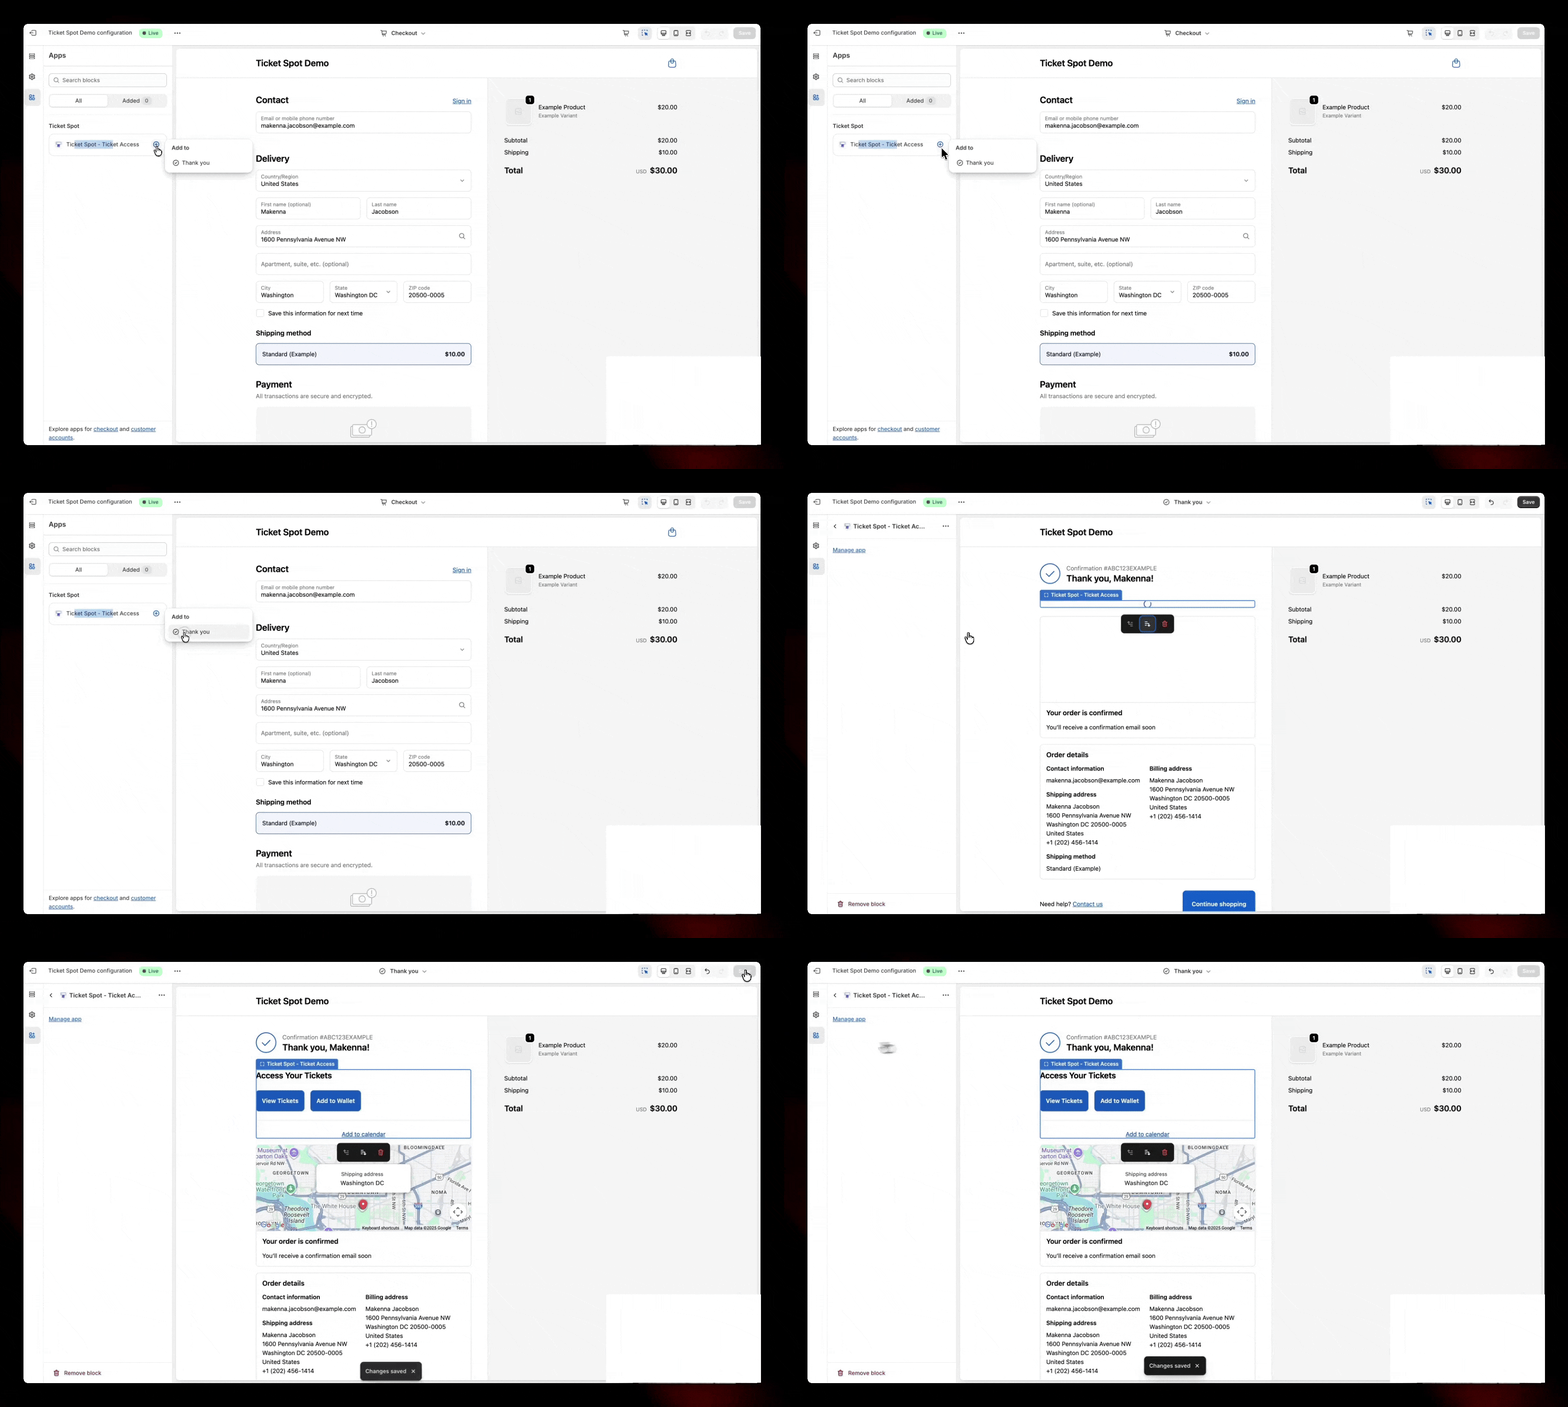
1. In Shopify, go to **Settings** and select **Checkout**. Then click on **Customize** to open the Checkout editor.
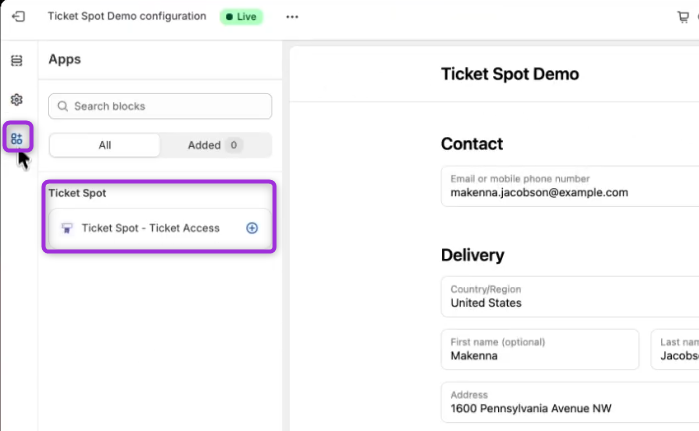
2. In the **Apps** section, select the **Ticket Spot – Ticket Access** block.
3. Select the **Thank You Page** and click **Save** to apply the changes.
## Access Tickets on the Thank You Page
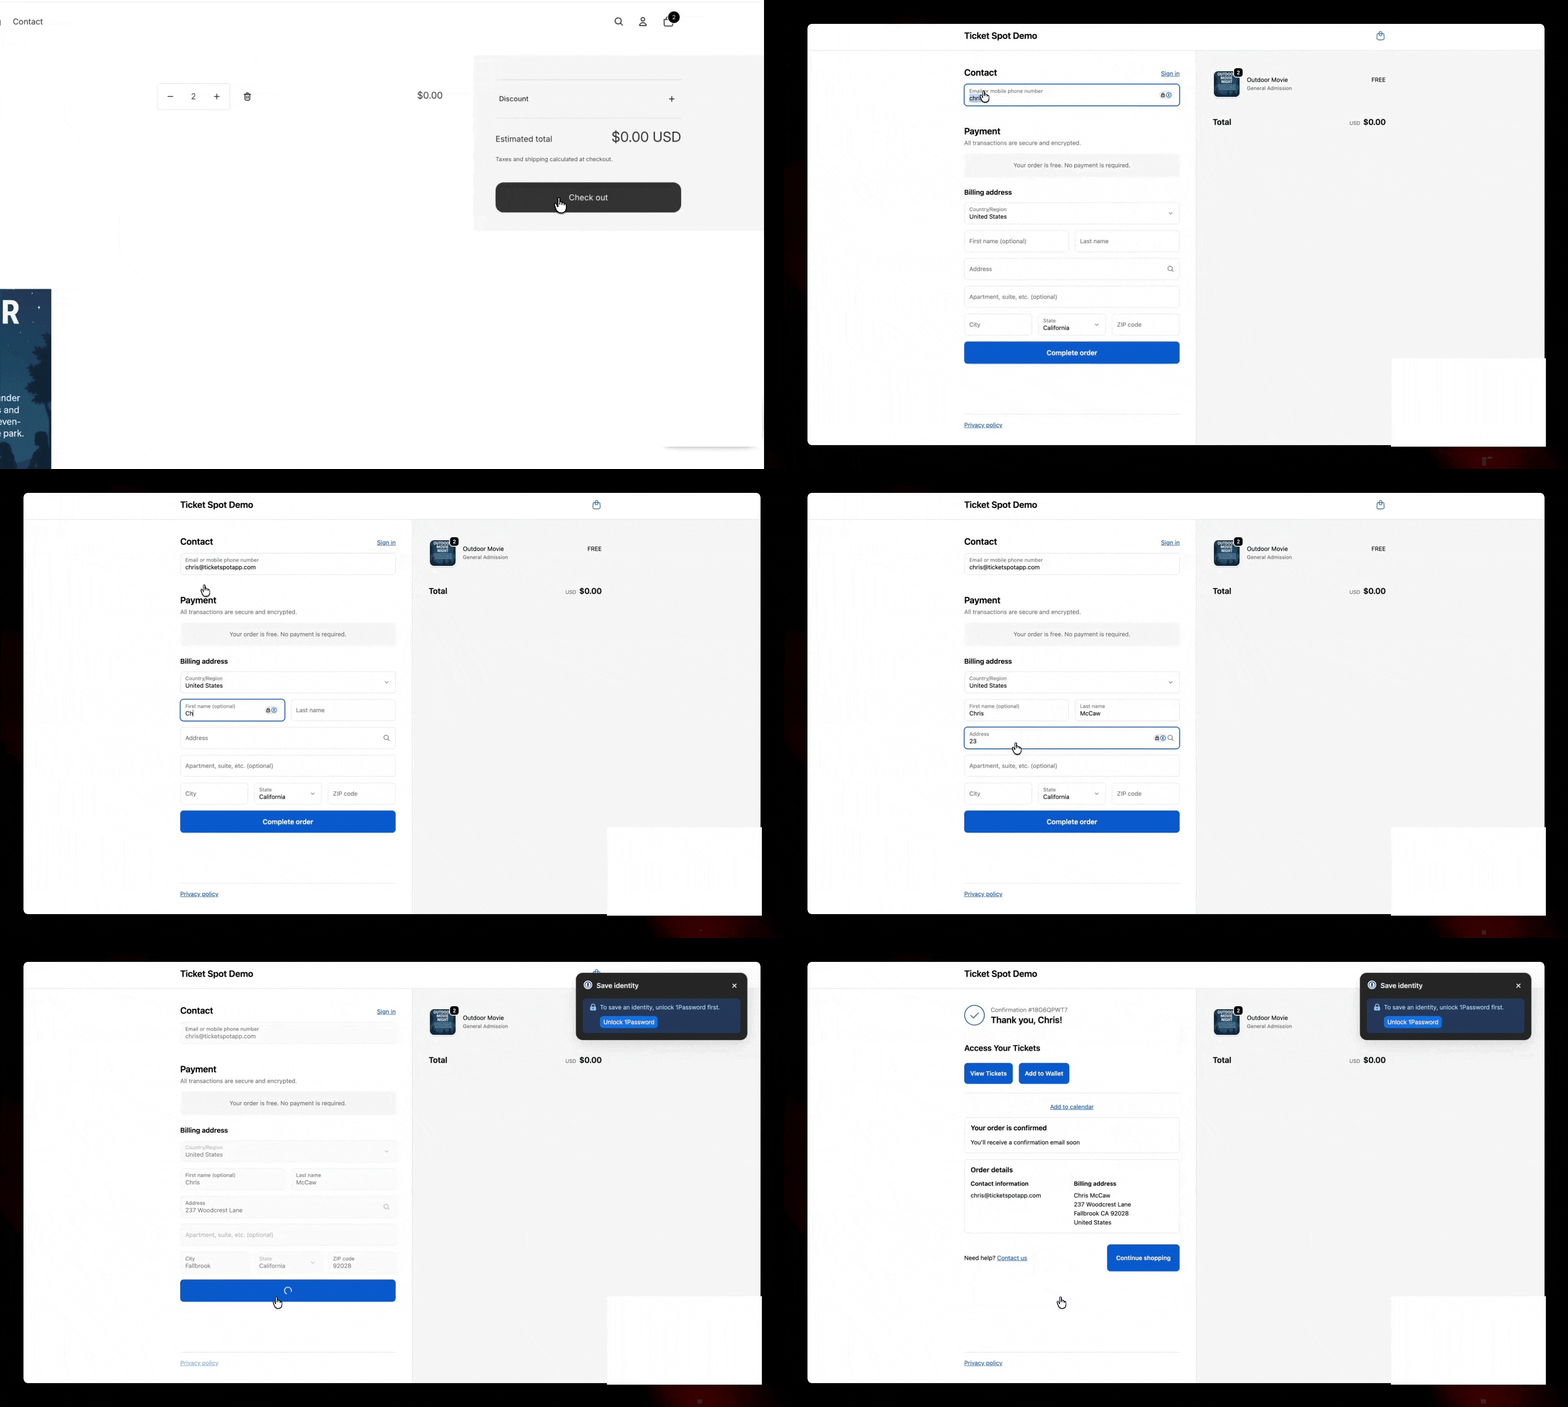
1. Complete your **ticket purchase** through the **Shopify** checkout page.
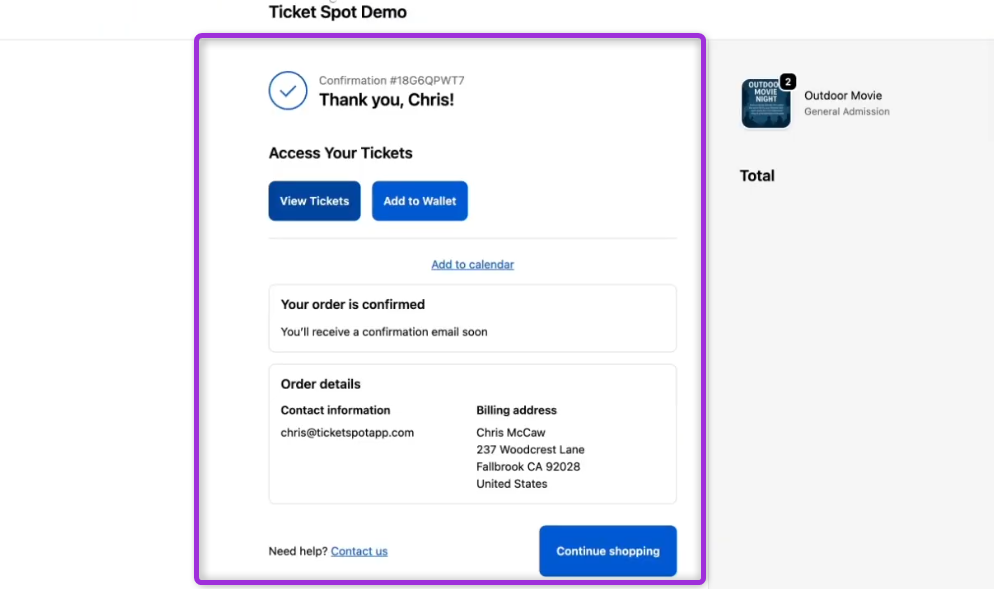
2. Once checkout is completed, the **Thank You** page will display your order details, including **View Tickets** and **Add to Wallet**.
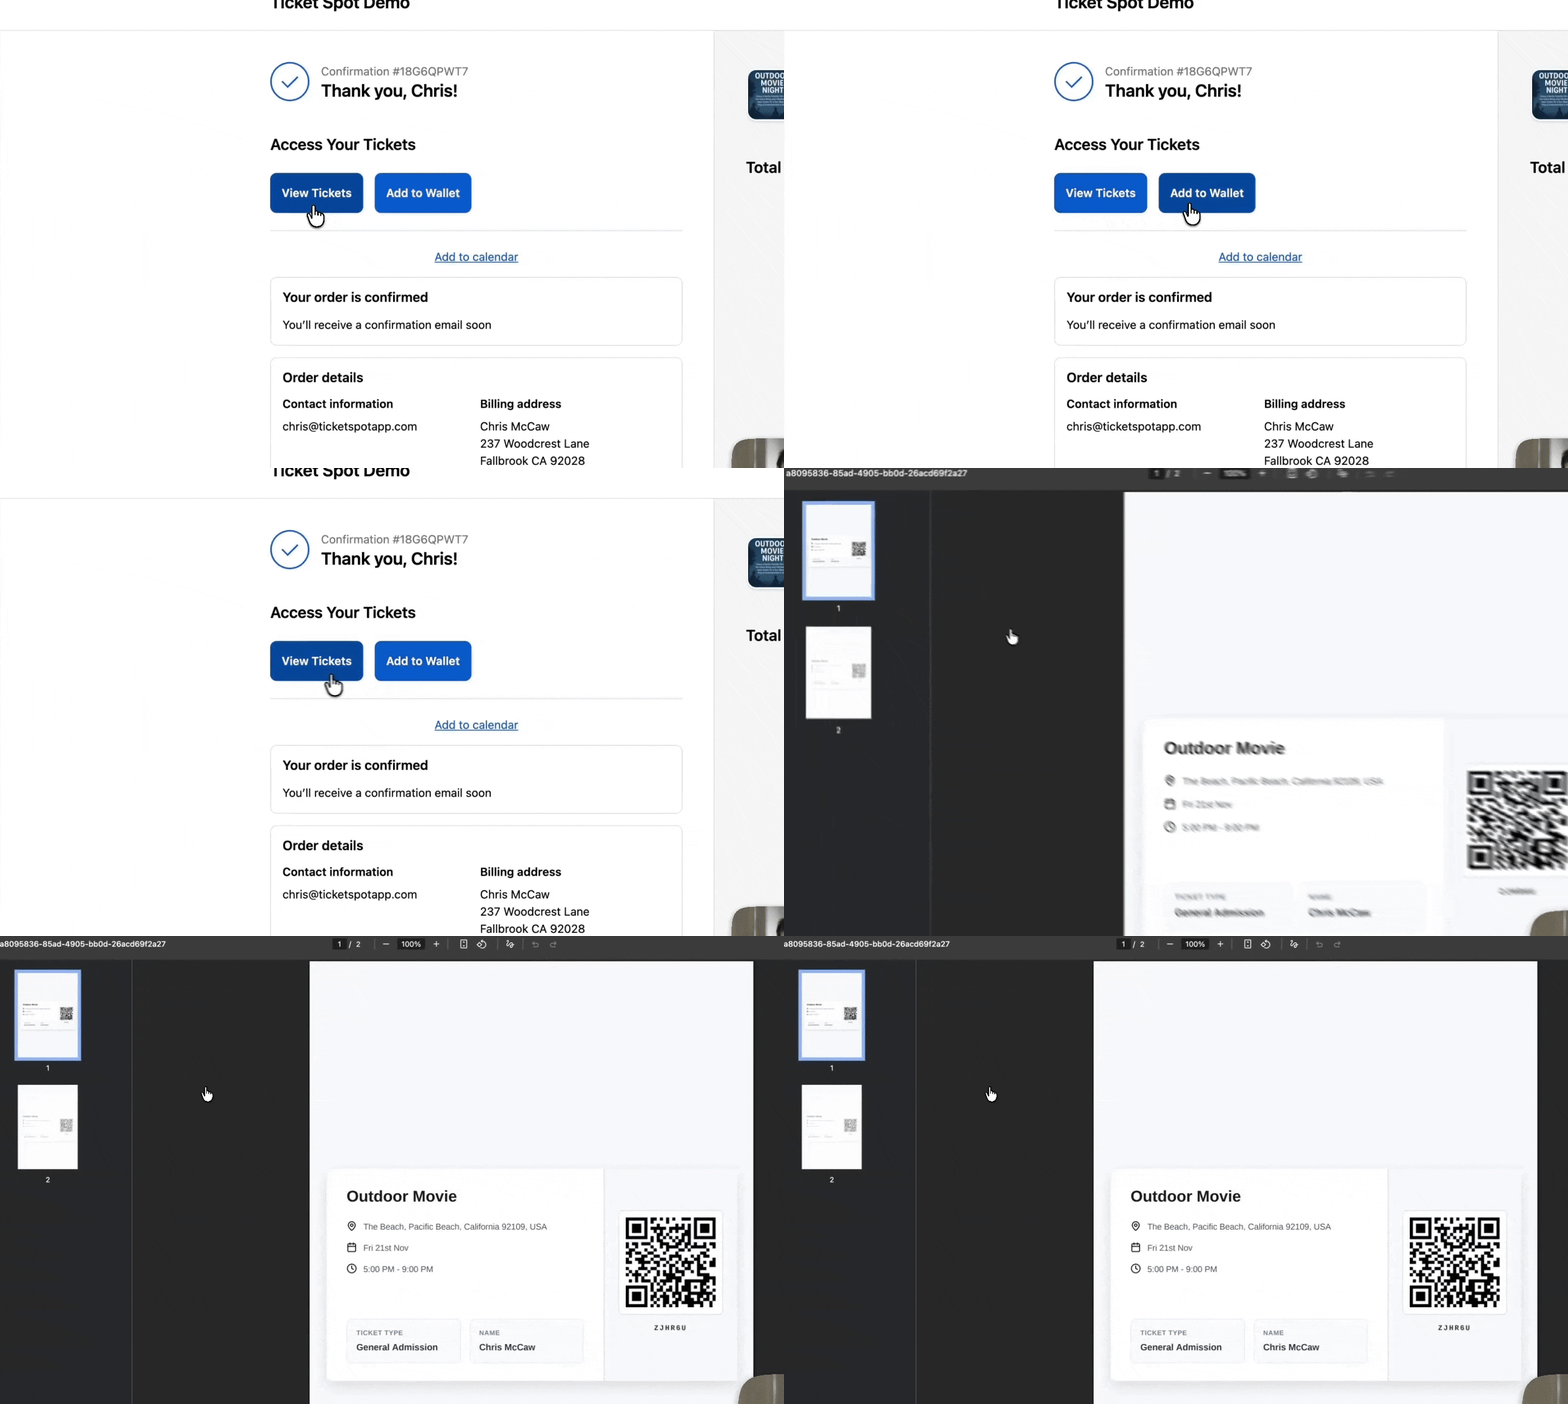
3. Click **View Tickets** or **Add to Wallet** to instantly download and access your ticket.
These features streamline your entire ticketing flow—helping you sell more, simplifying checkout, and giving guests a smoother, more enjoyable experience.
 A modal window will appear where you can **Create or Connect Your Site**.
 **Step 2:** Click **Connect Shopify** to start linking your store.
 ## Install the Ticket Spot App
1. You’ll be redirected to the Ticket Spot page in the **Shopify** App Store. Click **Install** to proceed.
## Install the Ticket Spot App
1. You’ll be redirected to the Ticket Spot page in the **Shopify** App Store. Click **Install** to proceed.
 2. Shopify authorization screen will appear, where you can authenticate yourself using your store credentials to complete the connection.
 Click **Install** to authorize Ticket Spot and grant access to view personal data and manage store data.
 Your **Shopify** store is now **connected**, and you will be redirected back to the **Ticket Spot** web app, where you can create your first event.
 ## Create Your Event
To create your event, enter the basic details, such as the event name, date, time, and venue. These fields help set up your event in Ticket Spot and prepare it for publishing.
For a full step-by-step walkthrough, please refer to our guide: **[How to Create an Event with Ticket Spot](../essentials/create-event-overview)**.
## Create Your Event
To create your event, enter the basic details, such as the event name, date, time, and venue. These fields help set up your event in Ticket Spot and prepare it for publishing.
For a full step-by-step walkthrough, please refer to our guide: **[How to Create an Event with Ticket Spot](../essentials/create-event-overview)**.
 ## Publish Your Event to Shopify
1. Click on the **Publish** button at the top of your event page.
## Publish Your Event to Shopify
1. Click on the **Publish** button at the top of your event page.
 2. Click on the **Publish to Shopify** to publish your event and updates to your Shopify store. This creates or updates the Shopify product that customers can purchase.
 3. Click on the **Share** button to post your event on social media or copy the event link, allowing shoppers to view your event and purchase tickets directly.
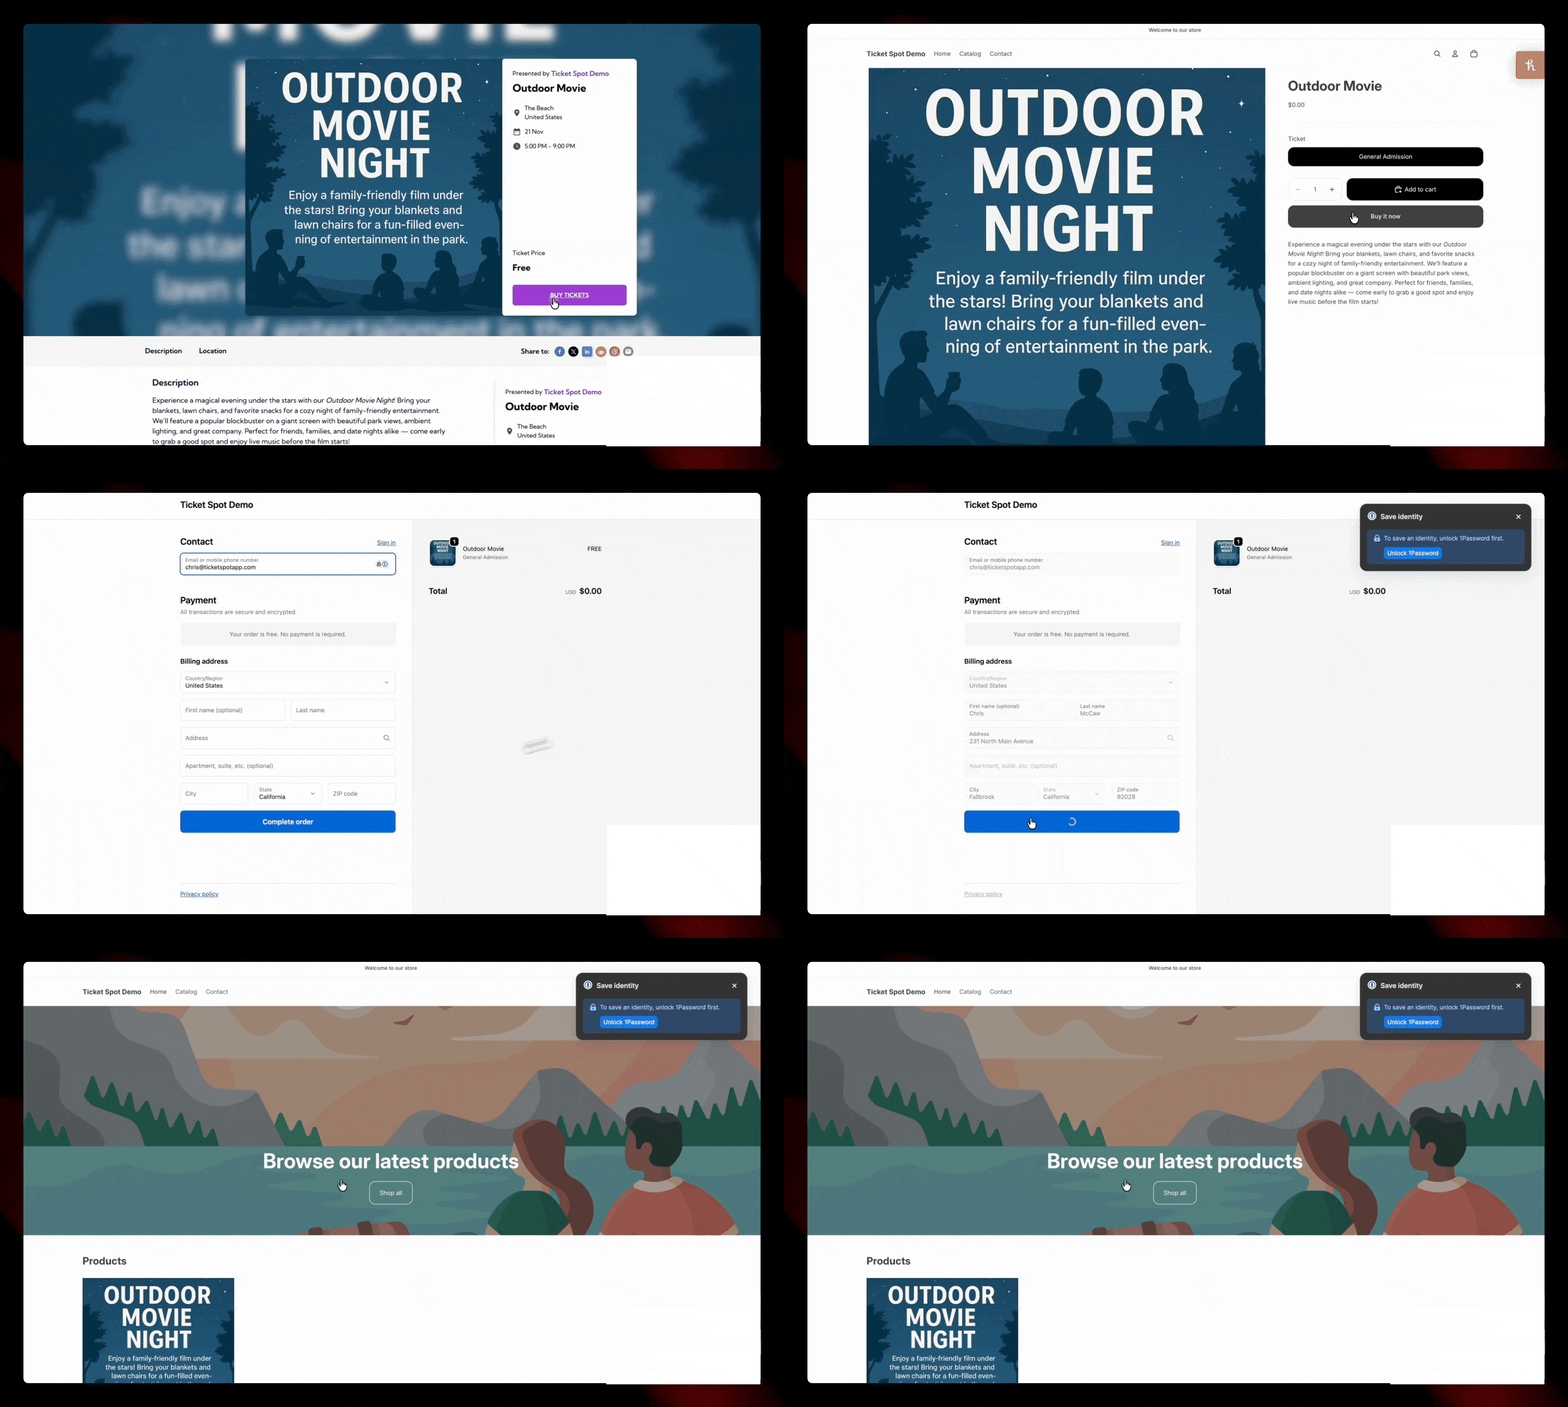
 ## Check Out the Event
1. Click on the **Event Page** or open the event link to open your event page, where your event is listed.
## Check Out the Event
1. Click on the **Event Page** or open the event link to open your event page, where your event is listed.
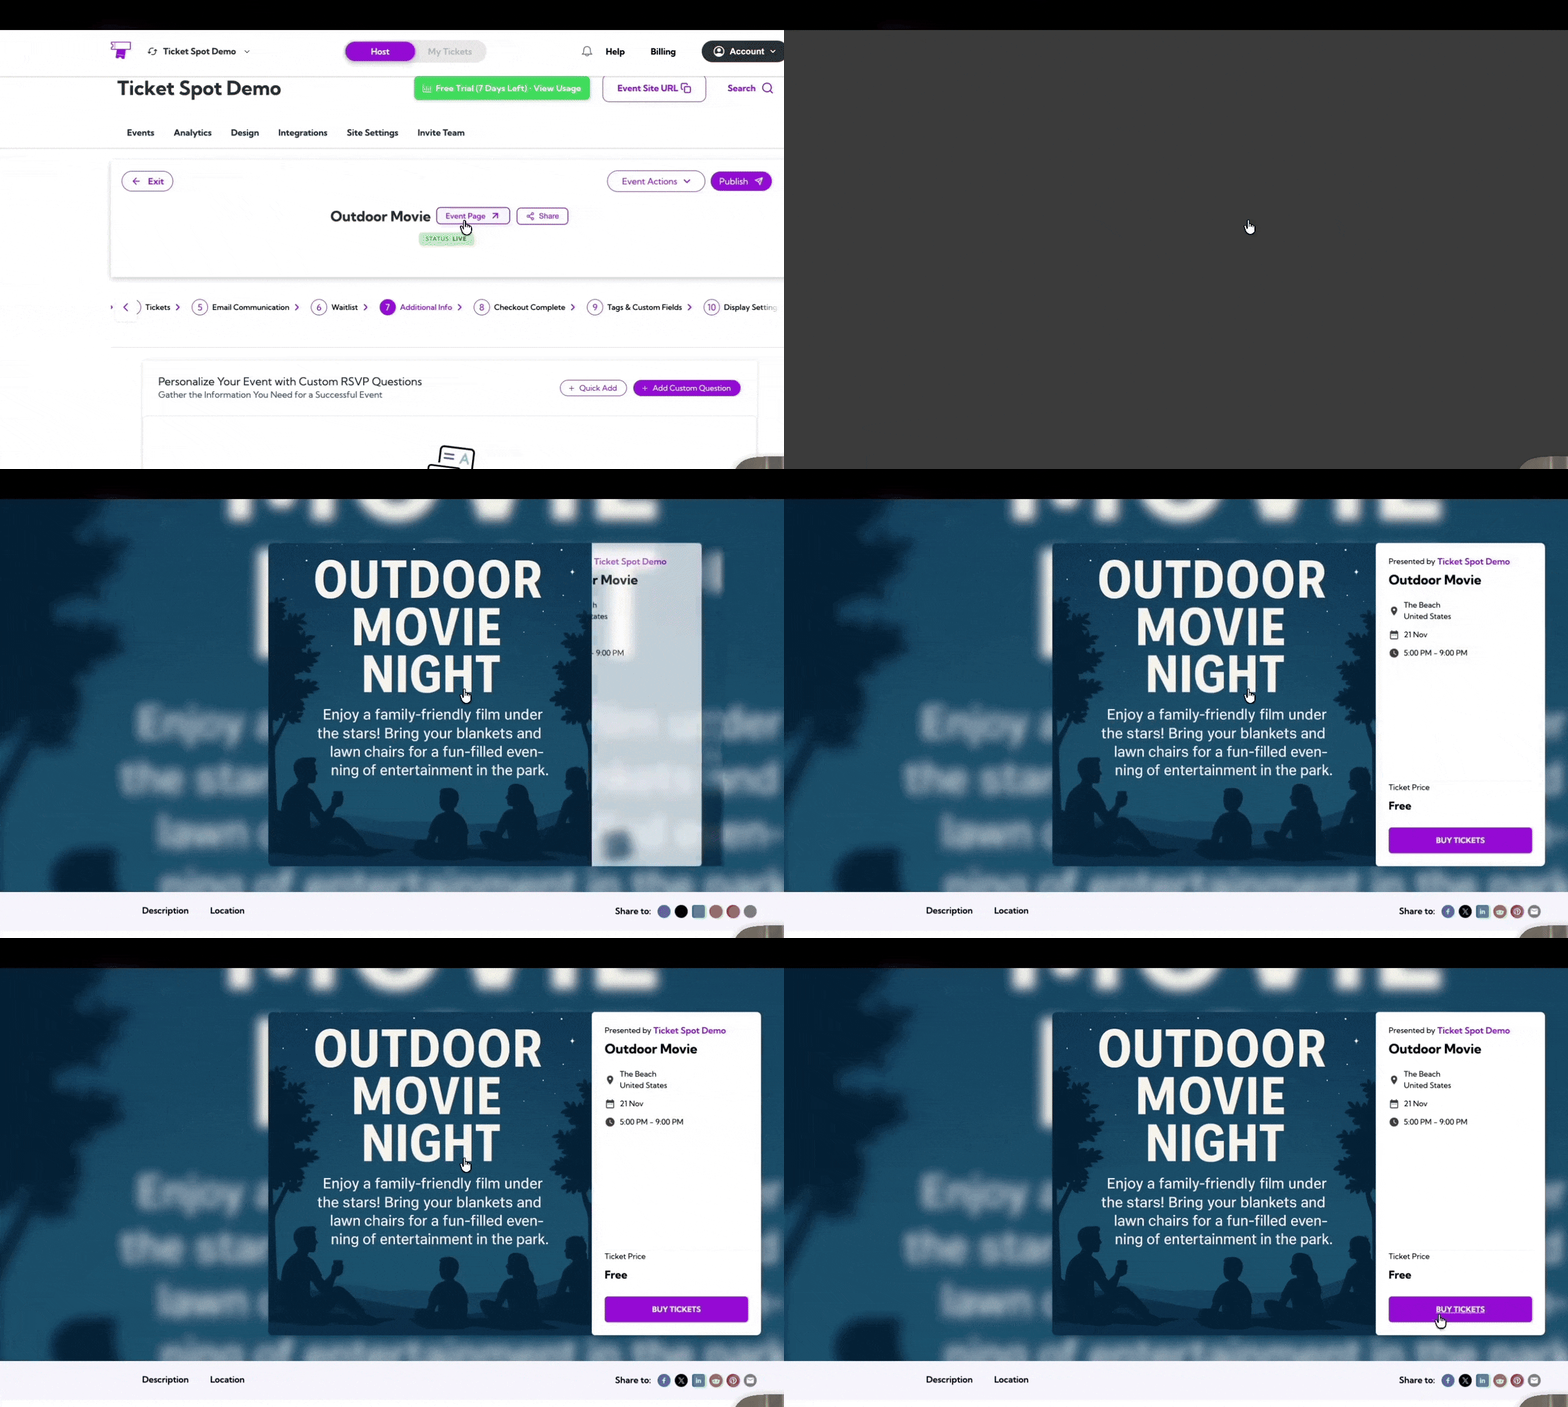 2. Click on **Buy Tickets** to purchase a ticket for the event and complete the checkout.
 ## View Attendees in Your Dashboard
Once the purchase is completed, Shopify automatically sends attendee and order details to Ticket Spot.
Open your event in Ticket Spot and click on the **Manage Attendees** to view attendees of your event.
## View Attendees in Your Dashboard
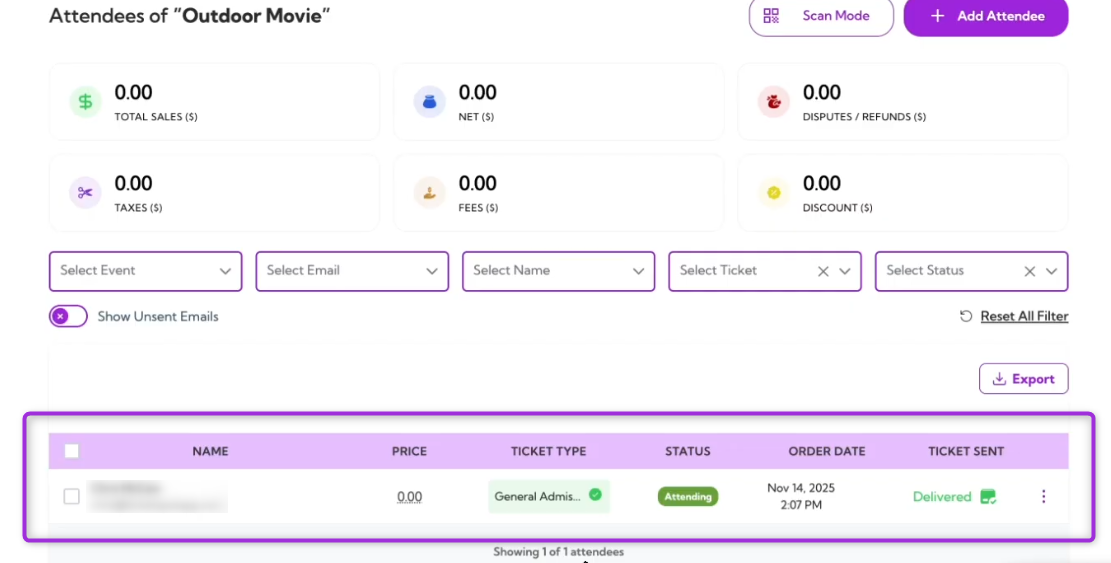
Once the purchase is completed, Shopify automatically sends attendee and order details to Ticket Spot.
Open your event in Ticket Spot and click on the **Manage Attendees** to view attendees of your event.
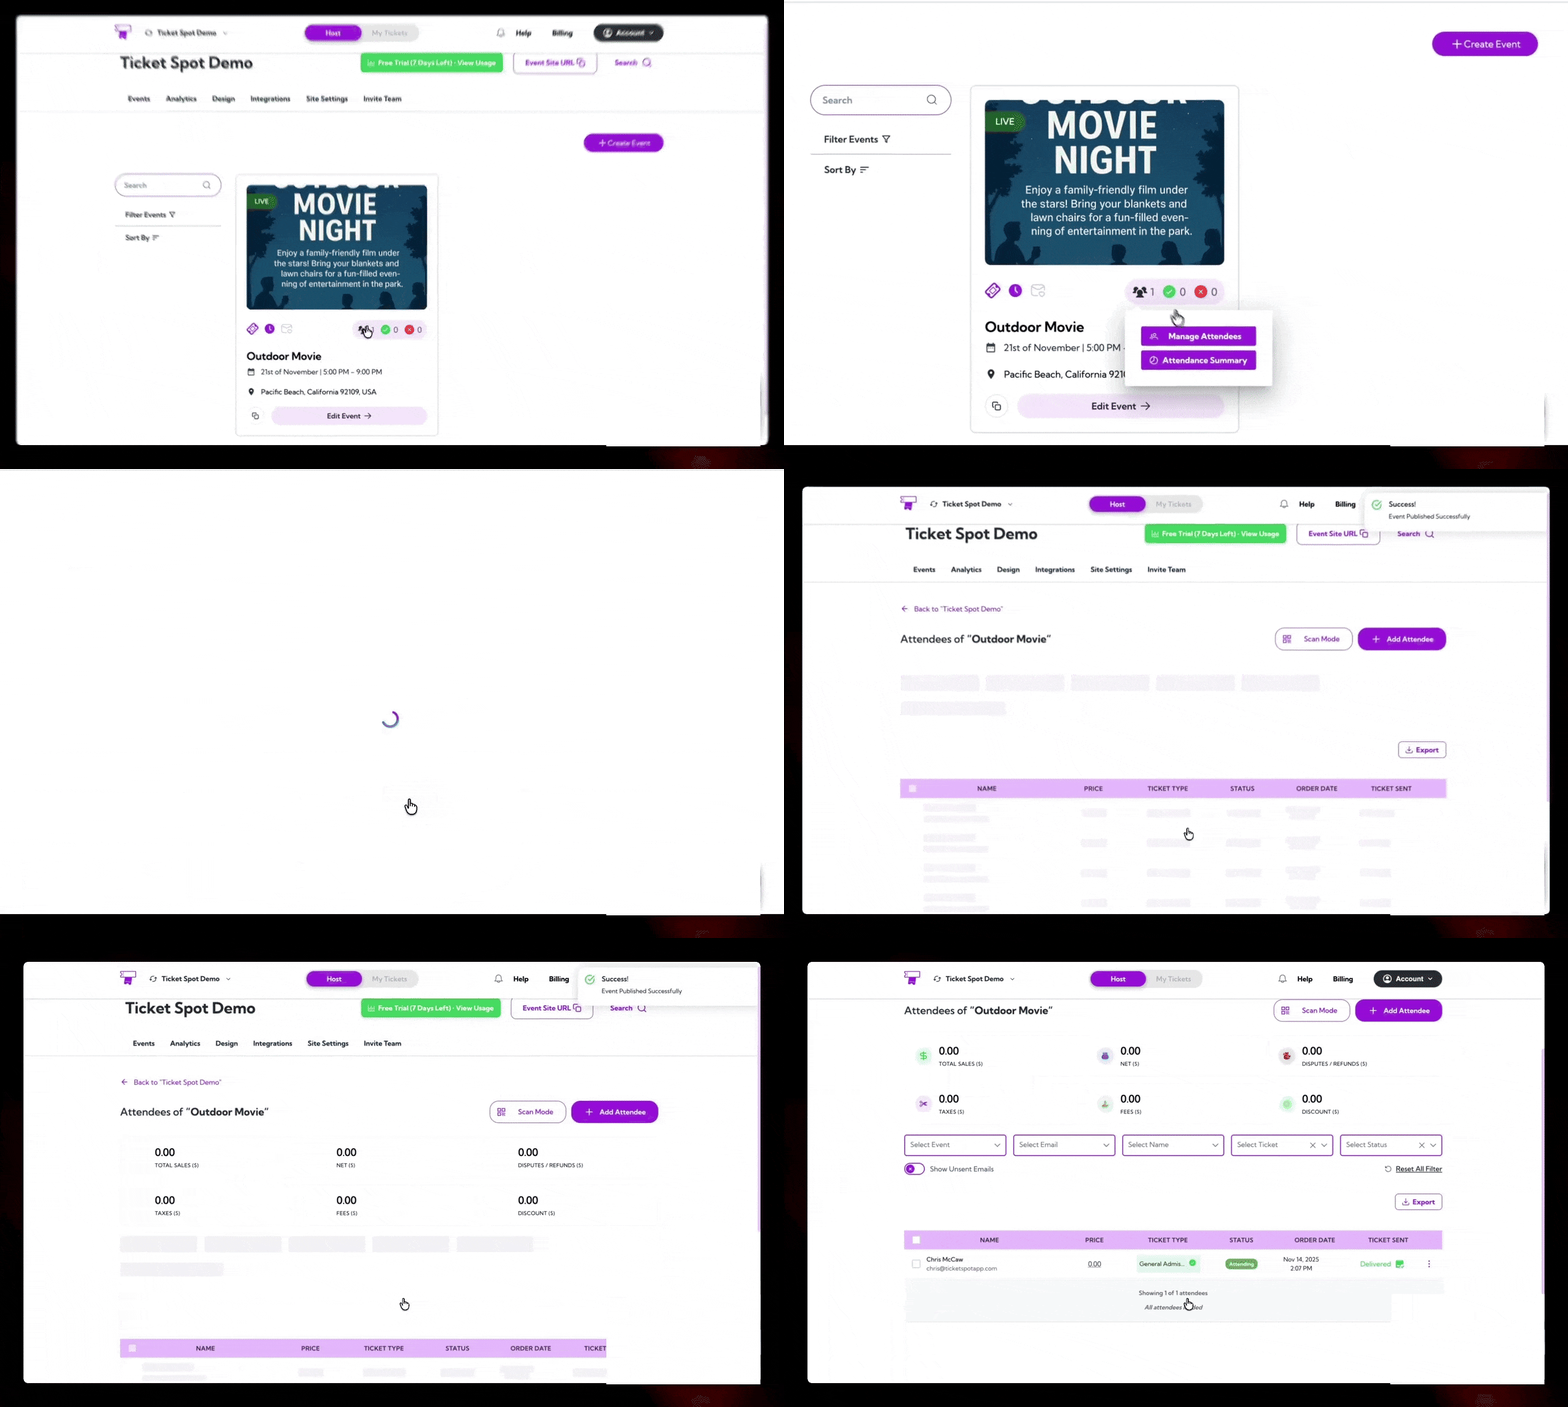 From here, you can see the full attendee list, update their status, view their details, send tickets, and manage all attendee actions in one place.
 ## Enable the Ticket Spot Selector (App Embed)
The App Embed allows you to replace Shopify’s basic variant dropdown with a clean **Buy Tickets** button. When enabled, it opens the Ticket Spot Selector—allowing guests to pick dates, timeslots, and ticket types directly on your product page.
1. In Shopify, open **Online Store** from the left-side menu and click on the **Customize** button.
## Enable the Ticket Spot Selector (App Embed)
The App Embed allows you to replace Shopify’s basic variant dropdown with a clean **Buy Tickets** button. When enabled, it opens the Ticket Spot Selector—allowing guests to pick dates, timeslots, and ticket types directly on your product page.
1. In Shopify, open **Online Store** from the left-side menu and click on the **Customize** button.
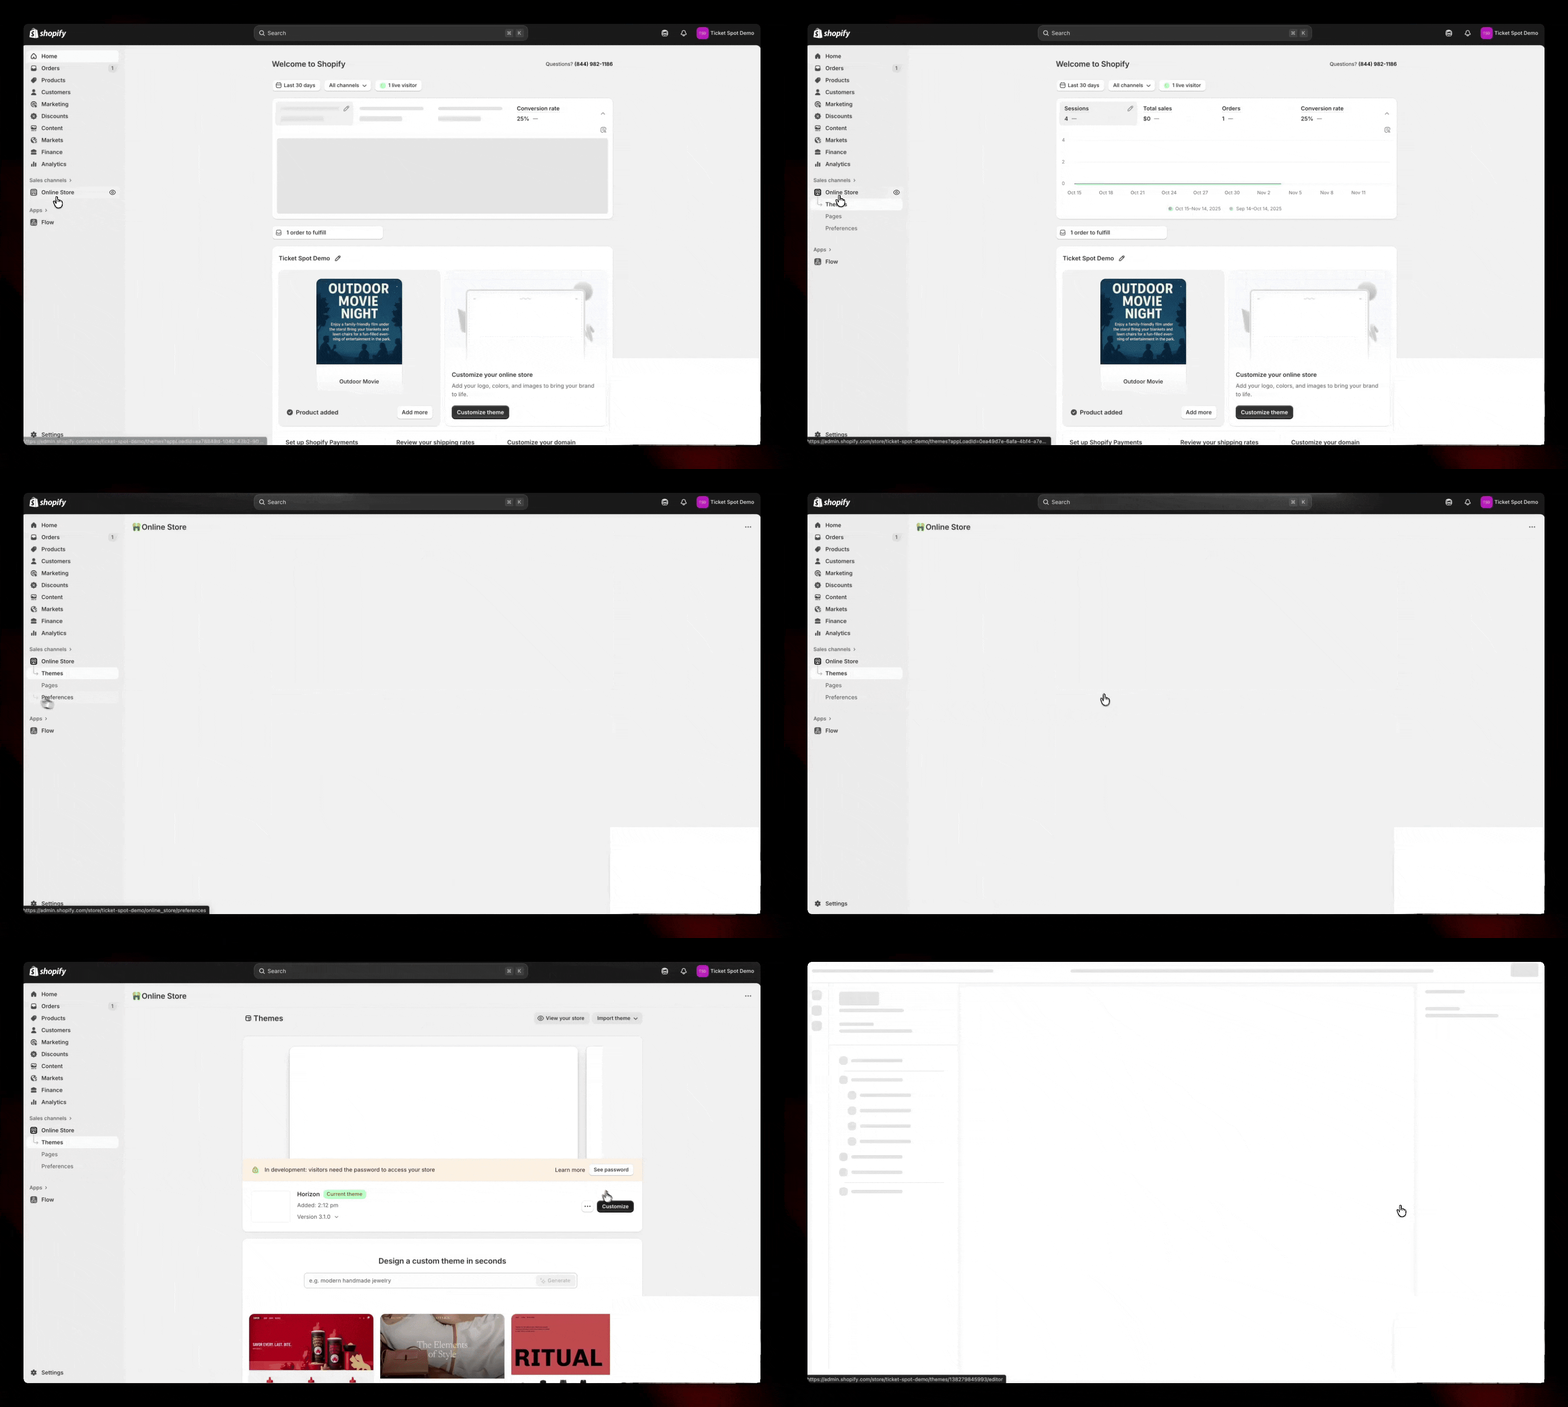 2. Go to **App Embeds**, enable **Ticket Spot Controls**, and click **Save** to activate.
 ## Configure Advanced Ticket Controls
Go back to your Ticket Spot event and click on the **Shopify Setup** button.
## Configure Advanced Ticket Controls
Go back to your Ticket Spot event and click on the **Shopify Setup** button.
 In Shopify Setup, you can:
* **Select a Collection** — Organize your event by adding it to a specific collection so customers can easily find it.
* **Select a Location** — Assign where the event will take place, helping you manage event details more accurately.
In Shopify Setup, you can:
* **Select a Collection** — Organize your event by adding it to a specific collection so customers can easily find it.
* **Select a Location** — Assign where the event will take place, helping you manage event details more accurately.
 ### Product Page Config:
* **Customize the “Buy Tickets” Button:** You can customize the Buy Tickets button text—for example, change it to **Checkout** or any label you prefer.
### Product Page Config:
* **Customize the “Buy Tickets” Button:** You can customize the Buy Tickets button text—for example, change it to **Checkout** or any label you prefer.
 * **Enable Ticket Spot Selector:** Activates a cleaner ticket-selection experience by replacing Shopify’s default checkout flow with Ticket Spot’s built-in ticket interface.
 After enabling the **Ticket Spot Selector**, your product page updates with a **Buy Tickets** button instead of variants. Clicking it opens the Ticket Spot Selector, where customers pick tickets, enter details, and proceed to checkout.
 ## Enable the Ticket Block on the Thank You Page
Ticket Spot gives customers instant access to their tickets—QR code, PDF, and Apple Wallet—directly on Shopify’s Thank You page, making the post-checkout experience faster and more convenient.
1. In Shopify, go to **Settings** and select **Checkout**. Then click on **Customize** to open the Checkout editor.
## Enable the Ticket Block on the Thank You Page
Ticket Spot gives customers instant access to their tickets—QR code, PDF, and Apple Wallet—directly on Shopify’s Thank You page, making the post-checkout experience faster and more convenient.
1. In Shopify, go to **Settings** and select **Checkout**. Then click on **Customize** to open the Checkout editor.
 2. In the **Apps** section, select the **Ticket Spot – Ticket Access** block.
 3. Select the **Thank You Page** and click **Save** to apply the changes.
 ## Access Tickets on the Thank You Page
1. Complete your **ticket purchase** through the **Shopify** checkout page.
## Access Tickets on the Thank You Page
1. Complete your **ticket purchase** through the **Shopify** checkout page.
 2. Once checkout is completed, the **Thank You** page will display your order details, including **View Tickets** and **Add to Wallet**.
 3. Click **View Tickets** or **Add to Wallet** to instantly download and access your ticket.
 These features streamline your entire ticketing flow—helping you sell more, simplifying checkout, and giving guests a smoother, more enjoyable experience.